Replacing a Dyson vacuum battery is usually a simple job for a U.S. owner. Most cordless Dyson models use either a screw-in battery or a click-in battery. The whole task often takes about 5 to 15 minutes, provided you buy the correct battery for your exact model.
Turn off and unplug the vacuum first. Remove the old battery, fit the new one, and charge it before use. Do not open the battery pack itself. Lithium-ion battery cells can cause fire or injury if damaged.
Introduction
A Dyson cordless vacuum may need a new battery when it runs for only a few minutes, stops under light use, or will not charge. A worn battery is not the only possible cause, so check the charger, filter, and blockage first.
This guide applies to Dyson cordless vacuums sold in the United States, including many V6, V7, V8, V10, V11, V12, V15, Outsize, and Gen5 models. The battery shape, screws, and release method vary by model. Always match the replacement battery to the model number printed on your vacuum.
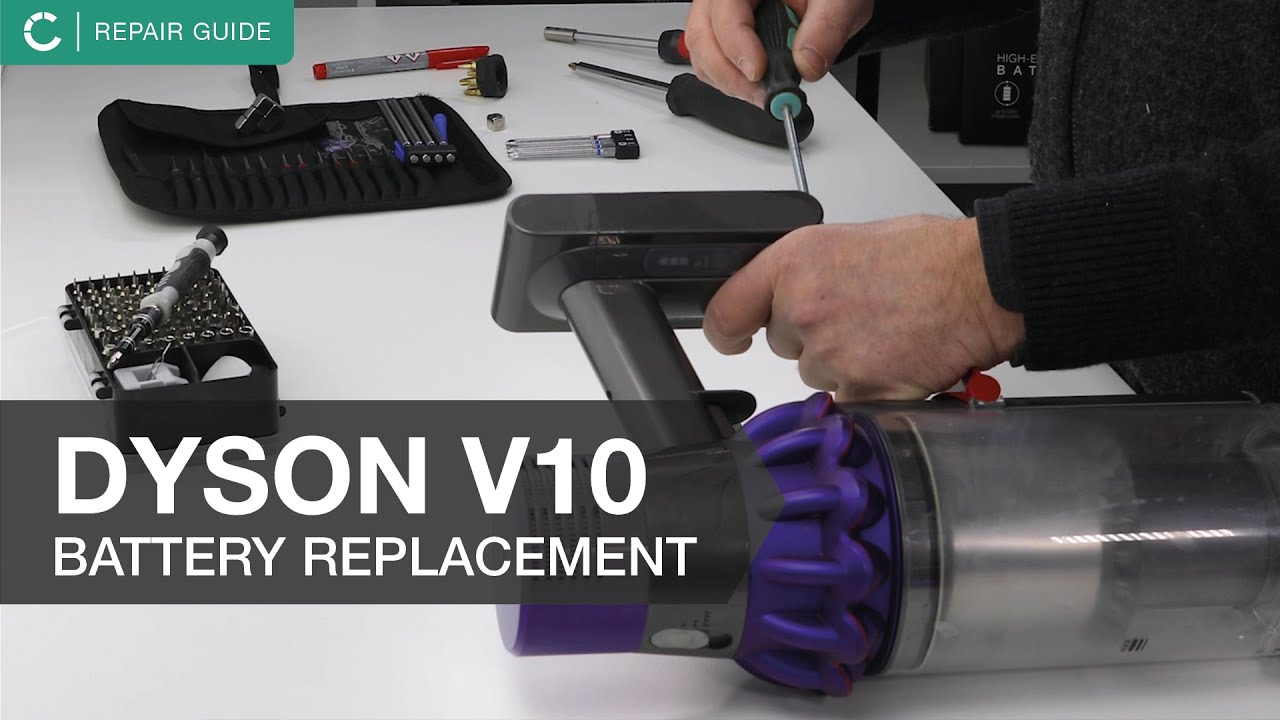
Before You Replace the Dyson Battery
The first step is to identify your exact Dyson model and battery type. A battery that fits one V-series vacuum may not fit another, even when the packs look similar.
Find the model number
Look for the model name or product label in one of these places:
- Behind or below the clear dust bin
- On the main body near the handle
- On the battery
- On the charger
- On the original box or receipt
- In the Dyson account or registration record
The model may be marked as V8 Animal, V10 Absolute, V11 Torque Drive, V12 Detect Slim, or V15 Detect. “Animal,” “Absolute,” and “Detect” often describe a package or cleaning head. The battery still must match the exact vacuum series and design.
Check whether the battery is screw-in or click-in
Dyson batteries generally fall into two groups:
| Battery style | How it attaches | Common clue |
|---|---|---|
| Screw-in | Held in place with screws | No large battery release button |
| Click-in | Slides into place and locks with a release button | Battery has a visible removal button |
Some newer Dyson cordless vacuums use a click-in battery. Many older models use a battery secured by screws. Do not force a click-in battery out with a screwdriver, and do not try to pry out a screw-in battery.
Gather the right tools
For a screw-in battery, you will usually need:
- A small Phillips screwdriver
- A clean, dry work surface
- The correct replacement battery
- The Dyson charger
The screw size can vary by model. A screwdriver that fits poorly can strip the screw head. Press the tool firmly into the screw and turn slowly.
Buy the correct replacement
Use the model number, not just the battery’s appearance, when selecting a replacement. Check:
- The exact Dyson model
- The battery voltage and connector design
- Whether the battery is screw-in or click-in
- The seller’s return policy
- Whether the battery is genuine Dyson or an aftermarket part
- Any effect on your warranty or service options
A genuine Dyson battery is the lowest-risk choice for fit and compatibility. An aftermarket battery may cost less, but quality, capacity, protection circuits, and warranty support can vary. Avoid a battery with a damaged case, loose connector, swelling, strong odor, or unclear specifications.
How to Change a Screw-In Dyson Battery
If your Dyson battery has screws, remove the battery from the vacuum before installing the new one. Keep the charger disconnected throughout the process.
1. Turn off and unplug the vacuum
Release the power trigger. Remove the vacuum from the charger and unplug the charger from the wall.
Do not work on the vacuum while it is charging. If the vacuum was recently used, let it cool before replacing the battery.
2. Remove the dust bin if it blocks access
On some Dyson models, the dust bin or bin release area can make the battery screws hard to reach. Empty the bin and move it to the open position if the design allows.
Do not remove parts that are not needed. The battery should come out without opening the motor housing.
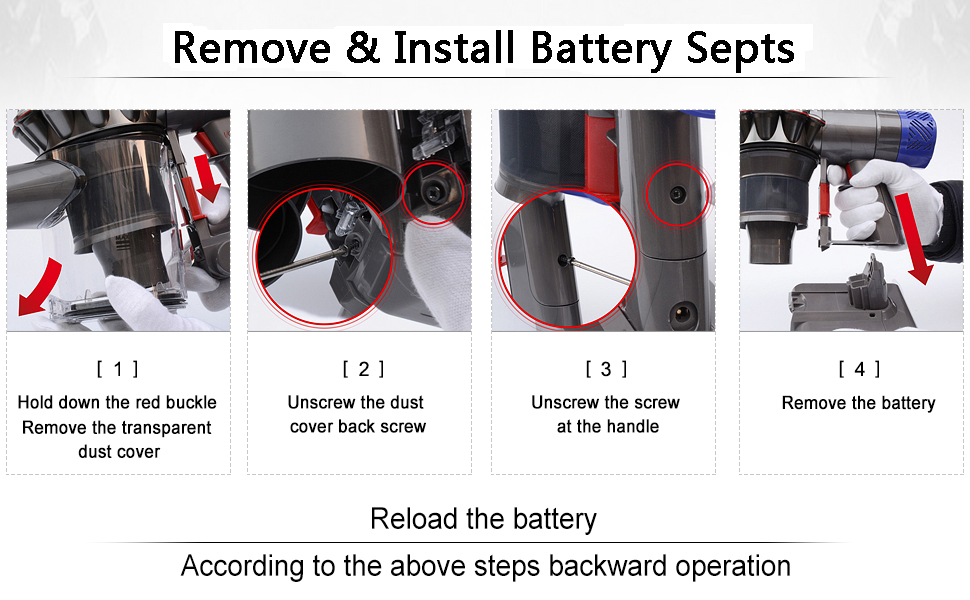
3. Remove the battery screws
Look for the screws on the underside of the handle and near the battery base. Many screw-in batteries have one screw near the handle and another near the bottom of the pack.
Keep the screws in a small container. They may not all be the same length, so note where each screw came from.
4. Pull the old battery away from the vacuum
Hold the vacuum body with one hand. Use the other hand to slide or pull the battery away from the handle.
Use steady force. Do not bend the battery, crush it, puncture it, or use a metal tool to pry against the battery cells.
Stop if the battery is swollen, cracked, hot, wet, or leaking. Place the vacuum in a safe area away from flammable items and contact Dyson or a qualified battery-recycling service for advice.
5. Position the new battery
Align the new battery with the rails, screw holes, and electrical contacts. It should sit flat against the vacuum body.
Do not push hard if the holes do not line up. This usually means the battery is the wrong type or is not positioned correctly.
6. Tighten the screws
Insert each screw by hand first. Turn it a few times before tightening the other screw. This helps keep the battery aligned.
Tighten the screws until the battery is secure. Do not overtighten them. Excess force can damage the plastic housing or strip the threads.
7. Charge and test the vacuum
Connect the Dyson charger and let the battery charge. The indicator may flash or light up during charging, depending on the model.
After charging, run the vacuum for a short test. Check that:
- The vacuum starts normally
- The battery does not move
- The charger connects properly
- The vacuum does not stop at once
- No burning smell, smoke, or unusual heat appears
If the vacuum works normally, the replacement is complete.

How to Change a Click-In Dyson Battery
A click-in Dyson battery can usually be changed without a screwdriver. The battery has a release button or latch that lets it slide out of the handle.
1. Switch off and unplug the vacuum
Remove the vacuum from the charger. Make sure the power trigger is not pressed.
Place the vacuum on a stable surface. Keep the battery and vacuum away from water.
2. Find the battery release button
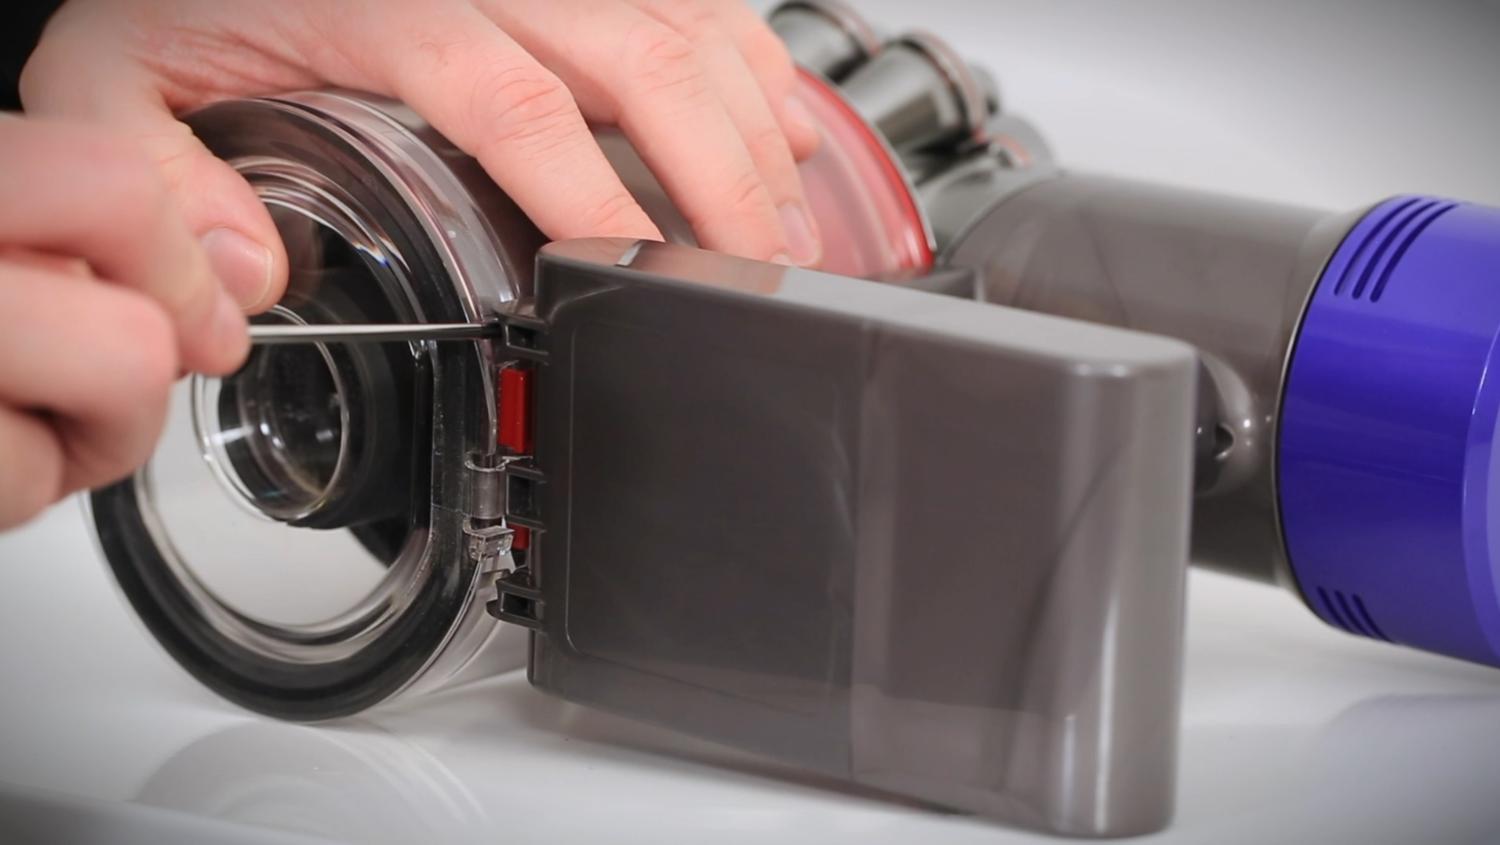
The release button is often near the bottom or side of the handle. Its exact position depends on the model.
Hold the vacuum firmly. Press the release button while sliding the battery out of the handle.
3. Remove the old battery
Pull the battery straight along its rails. Do not twist it from side to side.
If it will not move, check that you are pressing the correct release button. Do not use a screwdriver to force it out.
4. Slide in the replacement battery
Line up the battery rails with the slots in the handle. Slide the pack in until it clicks.
A clear click usually means the battery latch has engaged. Gently pull on the battery to confirm that it is locked in place.
5. Charge the new battery
Connect the charger and follow the charging instructions for your model. The battery indicator should show a charging status.
If no light appears, remove and reconnect the charger. You can also test the charger in another outlet. If the vacuum still does not charge, the issue may involve the charger, wall outlet, charging port, or the vacuum itself.

How to Tell Whether the Battery Needs Replacing
A short run time can point to a worn battery, but it can also result from a blocked filter, clogged cleaner head, or a fault in the charging system.
A battery is more likely to be the cause when several of these signs appear:
- The vacuum runs for much less time than it once did
- It stops quickly even after a full charge
- The indicator flashes an error pattern
- The vacuum works briefly, then shuts off under normal use
- The battery will not accept a charge
- The battery becomes unusually hot during charging
- The battery case is swollen or damaged
Rule out common problems first
Before buying a battery, perform these checks:
- Check the charger. Confirm that it is the correct Dyson charger and that the cable is not damaged.
- Try another wall outlet. A faulty outlet can look like a battery problem.
- Clean the filter. A dirty filter can restrict airflow and cause the motor to stop.
- Check for blockages. Inspect the wand, hose path, bin inlet, and cleaner head.
- Empty the dust bin. A full bin can reduce airflow.
- Let the vacuum cool. Some Dyson vacuums stop when the motor becomes too hot.
- Read the indicator lights. The exact meaning varies by model, so check the Dyson manual.
If the vacuum runs normally with the cleaner head removed but stops when the head is attached, the blockage may be in the head rather than the battery.
What to Do If the New Battery Does Not Work
A new battery that fails to start the vacuum does not always mean the battery is defective. Check the installation and charging path in a safe order.
If the vacuum will not turn on
- Remove and reinstall the battery.
- Confirm that a click-in battery is fully latched.
- Check that screw-in batteries sit flat and that the screws are secure.
- Charge the battery with the correct Dyson charger.
- Test a different wall outlet.
- Look for damaged contacts or debris around the connector.
Do not scrape electrical contacts with a sharp tool. If the contacts are bent, burned, or loose, stop using the vacuum.
If the vacuum stops after a few seconds
Check the filter and air path before blaming the battery. A blockage can cause the motor to shut down for protection.
Let the vacuum cool, then clean the filter according to the Dyson instructions. Filters must be fully dry before they go back into the vacuum. A wet filter can damage the motor and create an electrical hazard.
If the battery gets hot or smells unusual
Stop charging and stop using the vacuum. Move it away from paper, fabric, gasoline, and other flammable materials if you can do so safely.
Do not put a hot, swollen, smoking, or leaking lithium-ion battery in the trash or a regular recycling bin. Contact Dyson, your local household hazardous-waste program, or a battery-recycling provider for handling instructions. In the United States, local rules differ by state and city.

Battery Safety and Disposal in the United States
Treat a Dyson battery as a lithium-ion battery. It stores a large amount of energy in a small pack, so damage, heat, water, and short circuits can create a fire risk.
Follow these safety rules:
- Do not open the battery casing.
- Do not puncture, crush, bend, or burn the battery.
- Do not charge a visibly damaged battery.
- Do not use a battery with a swollen case.
- Keep loose batteries away from keys, coins, and other metal objects.
- Do not store the battery in extreme heat or freezing conditions.
- Keep the battery away from children and pets.
- Use the charger intended for the vacuum model.
- Follow the instructions in the Dyson owner’s manual.
For disposal, check your city or county waste department first. The U.S. Environmental Protection Agency advises consumers to keep lithium-ion batteries out of household trash and curbside recycling because they can start fires in collection and recycling equipment.
Some communities accept rechargeable batteries through household hazardous-waste events or special drop-off programs. Call2Recycle also lists participating collection locations in parts of the United States, but acceptance rules can vary by location. Tape exposed battery terminals or place the battery in a separate plastic bag only when the local program instructs you to do so.
How Long Should a Replacement Dyson Battery Last?
Battery life depends on the Dyson model, cleaning mode, floor type, attachment, filter condition, and age of the pack. A vacuum used often in high-power mode may use more battery energy than one used in a low-power mode.
Do not judge the new battery by one short cleaning session. Charge it fully, then use the vacuum under normal conditions. A new pack should provide stable operation without sudden shutdowns, but the exact run time must be compared with the specifications for your model.
A replacement battery will not fix every run-time problem. Excessive suction load, a blocked air path, a worn motor, or a damaged charger can produce similar symptoms.
Common Mistakes to Avoid
The most common mistake is ordering a battery by appearance alone. Dyson has many cordless models with similar-looking packs, but their connectors and mounting systems may differ.
Avoid these errors:
- Buying a V8 battery for a V10 or V11 without verified compatibility
- Confusing a vacuum package name with the actual model series
- Forcing a battery that does not slide into place
- Using the wrong charger
- Overtightening battery screws
- Testing a swollen or damaged battery
- Washing a filter and reinstalling it while wet
- Throwing the old battery into household trash
- Opening the battery pack to replace individual cells
If the battery is still covered by a Dyson warranty or service plan, check the terms before installing a third-party part. A Dyson service center may be the better choice when the vacuum has an electrical fault, damaged contacts, or a problem beyond the battery.
Key Takeaways
- Identify the exact Dyson model before buying a battery.
- Use a screw-in or click-in replacement that is listed for that model.
- Turn off and unplug the vacuum before starting.
- Remove screws carefully, or use the battery release button when provided.
- Do not open, crush, puncture, or charge a damaged lithium-ion battery.
- Check the charger, filter, and air path if a new battery does not solve the problem.
- Recycle or dispose of the old battery through a U.S. program that accepts lithium-ion batteries.
Frequently Asked Questions
Can I replace a Dyson vacuum battery myself?
Yes. Many Dyson cordless batteries are designed for user replacement. Screw-in batteries require a suitable screwdriver, while click-in batteries usually need no tools. If the battery or connector is damaged, use Dyson service or a qualified repair provider instead.
How do I know which Dyson battery to buy?
Find the exact model number on the vacuum, battery, charger, or original paperwork. Then match that model to the battery listing. Do not rely only on the number of battery contacts, color, or overall shape.
Why does my Dyson still stop after I install a new battery?
A blockage, dirty filter, overheating motor, faulty charger, or damaged charging connection may be responsible. Clean and dry the filter, inspect the air path, confirm the charger, and check the model-specific indicator code.
Can I leave my Dyson vacuum on the charger?
Follow the instructions for your specific model. Dyson cordless vacuums are generally designed to charge from their supplied charger, but the exact charging guidance can vary. Keep the charger and battery away from water and heat.
Can I put the old Dyson battery in the trash?
No. Do not place a lithium-ion Dyson battery in household trash or a regular recycling bin. Contact your local waste authority, a household hazardous-waste program, Dyson, or a battery collection service for current U.S. disposal instructions.
Conclusion
Changing a Dyson vacuum battery is usually a quick repair when the replacement matches the exact model. First identify the battery style, then remove the old pack with the correct method. Charge the new battery and test the vacuum only after the pack is secure.
If the vacuum still has poor run time or will not start, check the filter, blockages, charger, and indicator lights before buying another part. For swelling, heat, smoke, liquid damage, or burned electrical contacts, stop using the vacuum and seek proper service or battery-disposal guidance.

Liora Pennings is a seasoned chef and kitchen enthusiast with a passion for turning everyday cooking into an effortless experience. With years of hands-on culinary expertise, she specializes in practical techniques, ingredient know-how, and smart kitchen solutions that help home cooks elevate their meals. At KitchFlair.com, Liora shares her best tips, time-saving tricks, and honest product reviews to guide readers toward a more efficient, enjoyable, and inspired cooking routine. Whether you’re a beginner or a seasoned home chef, Liora’s friendly, knowledge-packed insights make every visit to the kitchen a little easier—and a lot more delicious.