How To Use An Apple Peeler Corer Slicer: Easy Guide
Secure the apple, turn the handle, and let the blade peel, core, and slice it in one pass.
Learning how to use an apple peeler corer slicer can make pie prep, snacks, and lunch boxes much faster. With the right setup, steady pressure, and a few simple safety habits, this handy tool turns a whole apple into neat slices in seconds.
What an Apple Peeler Corer Slicer Does
An apple peeler corer slicer is a manual kitchen tool with three main jobs:
• A sharp blade removes the apple’s skin.
• A circular coring ring removes the seeds and core.
• A slicing wheel cuts the fruit into a spiral or separate slices.
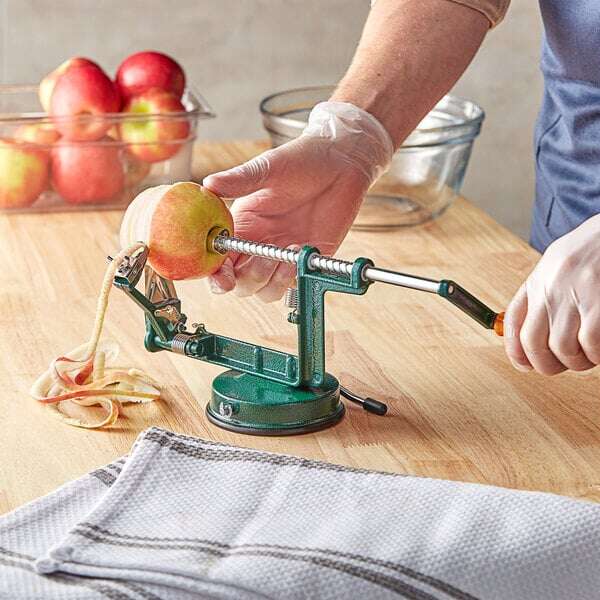
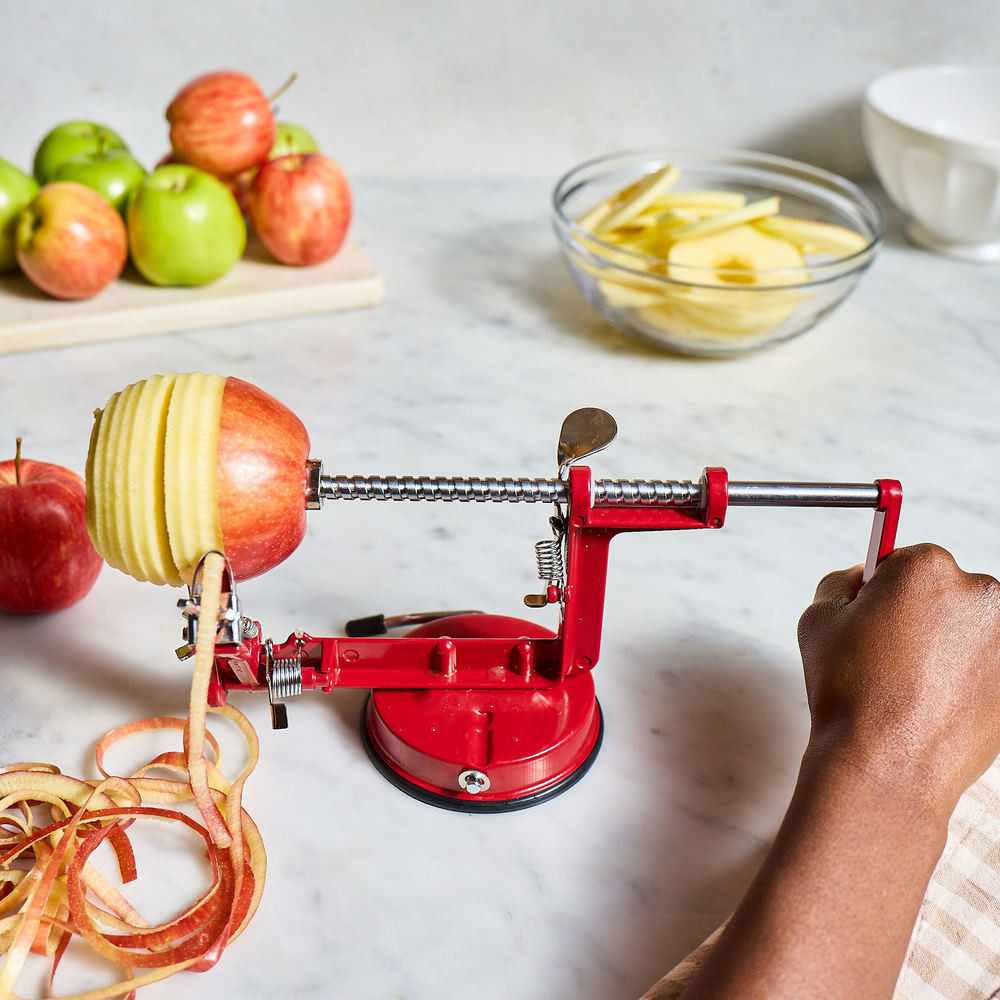
Most models use a suction base or clamp to hold the tool on your counter. You place the apple on a center prong, then turn a handle. As the apple moves toward the blade, the tool peels, cores, and slices it at the same time.
Knowing how to use an apple peeler corer slicer starts with understanding this path. The apple must stay centered, and the blade must meet the fruit at a steady angle.

Choose and Prepare the Right Apple
The best apples for this tool are firm, fresh, and close to round. Gala, Fuji, Honeycrisp, Granny Smith, and Pink Lady apples usually work well.
Very soft apples can collapse under pressure. Very uneven apples may leave patches of skin or cause the coring ring to miss the center.
Before you begin:
• Wash the apple under cool running water.
• Dry it well so it does not slip from the prongs.
• Remove any produce sticker.
• Cut away bruised or damaged spots.
• Check that the apple fits between the tool’s prongs and blade.
You do not need to peel the apple by hand first. That is the main benefit of this tool. A quick wash and a dry surface are usually enough.

How to Use an Apple Peeler Corer Slicer Step by Step
Follow these steps for clean, even results. The first apple may take a little practice, but the motion soon feels natural.
1. Place the tool on a stable surface
Set the apple peeler corer slicer near the edge of a strong counter. Leave enough room for the peeled apple slices to extend beyond the tool.
Press the suction lever down, or tighten the clamp according to the model’s instructions. Try to move the base before adding an apple. If it shifts, secure it again.
A stable base is the foundation of how to use an apple peeler corer slicer safely. If the tool slides, the blade may catch or the apple may come loose.
2. Inspect the blade and coring ring
Make sure the peeling blade is attached and aligned with the apple prongs. The coring ring should sit in line with the center of the prongs.
Some models have an adjustable blade. Move it slightly closer for a thinner peel or farther away for a thicker peel. Do not touch the sharp edge with your fingers.
3. Mount the apple
Hold the apple upright. Push the stem end onto the center prongs, using firm but controlled pressure.
The apple should sit straight, not at an angle. If the fruit is tilted, the slicer may create uneven pieces or leave part of the core behind.
For large apples, press them onto the prongs with the palm of your hand. Keep your fingers away from the blade and coring ring.
4. Move the blade into position
Turn the handle slowly until the apple moves toward the peeling blade. Stop when the blade lightly touches the skin.
Do not force the blade into the apple. It should shave the skin as the apple turns. Too much pressure can remove thick layers of fruit or make the handle hard to turn.
5. Turn the handle at a steady pace
Use one smooth motion to turn the handle. The apple should rotate while the blade travels across its surface.
Keep your other hand away from the moving parts. Watch the apple as it turns, especially during your first few uses.
The peeling blade removes the skin first. Then the coring ring passes through the center, and the slicing wheel separates the fruit into pieces.
6. Finish the apple and remove it
Continue turning until the blade reaches the far end of the apple. Stop when the fruit has passed the coring ring.
Pull the handle back if your model requires it. Then carefully slide the peeled apple slices from the center prong.
The leftover core should look like a narrow cylinder. If seeds remain in the slices, remove them with a small paring knife before serving.
This simple process explains how to use an apple peeler corer slicer for pies, applesauce, dried fruit, and quick snacks.

How to Get Better Peels and Slices
Good results depend on more than turning the handle. Small changes in apple choice and technique can make a big difference.
Keep the apple centered
A centered apple produces even slices. If the core is off-center, the tool may cut through one side of the fruit and leave a thick section on the other.
Look at the apple from the front before turning the handle. Adjust it on the prongs if it appears tilted.
Use a steady turning speed
Fast cranking can tear the peel or make the slicer skip. Slow turning gives the blade time to follow the fruit’s shape.
A steady pace also helps when working with firm apples. Think of the handle as a small hand wheel, not a speed test.
Adjust the blade gently
Some apple slicers let you set the peeling depth. Start with a shallow setting. You can make the peel thicker if the blade leaves too much skin.
A thin peel setting saves more edible fruit. However, it may leave small patches of skin on apples with deep ridges.
Trim unusual apples first
If an apple has a large bump, a flat side, or a deep dent, trim that spot before mounting it. This helps the blade move more evenly.
Do not use a damaged or rotten apple in the slicer. Soft areas can catch on the blade and create a messy result.
In hands-on testing, the most common early mistake is pushing the blade too hard. Let the tool do the work. Your goal is gentle contact, not force.
Common Mistakes to Avoid
Even a simple kitchen gadget can perform poorly when it is used in the wrong way. These errors are easy to fix.
Using a wet apple
Water on the skin can make the apple slippery. Dry the fruit and the prongs before you begin.
Skipping the base lock
A loose suction base may lift during use. Test the base with an empty turn of the handle before mounting the apple.
Choosing a soft apple
Soft fruit can tear instead of slicing. Use a firm apple for the cleanest result.
Turning the handle too quickly
Fast movement can cause uneven slices and jagged peels. Turn at a calm, even pace.
Forcing the blade
If the handle becomes hard to turn, stop. Check the apple’s position, the blade alignment, and the base. Forcing the tool may damage the blade or bend the mechanism.
Ignoring the core
The coring ring removes most of the core, but it may not remove every seed. Check the slices before baking or serving them to children.
Treating all models as identical
Some tools have a suction base, while others use a clamp. Some can peel only, and others can peel, core, and slice. Read the product instructions before changing settings or removing parts.

Cleaning and Storing the Tool
Clean the apple peeler corer slicer after every use. Apple juice contains sugar and acid, which can leave sticky residue on the blade and metal parts.
Use this routine:
-
Remove the apple core and loose peel.
-
Detach removable parts if the manual allows it.
-
Rinse the blade, prongs, and coring ring with warm water.
-
Wash with mild dish soap and a soft sponge.
-
Use a small brush for fruit stuck near the coring ring.
-
Dry every part before storage.
Do not place a sharp blade in a sink full of cloudy water. Someone may reach into the water and get cut. Wash it where you can see the blade.
Check the care label before using a dishwasher. Some stainless-steel parts are dishwasher safe, but the base, gears, suction pad, or handle may not be.
Knowing how to use an apple peeler corer slicer also means knowing how to care for it. A clean, dry tool works better and is less likely to develop rust or odor.

Safety Tips for Adults and Children
An apple peeler corer slicer has sharp edges and moving parts. Use it with the same care you would use with a box grater or mandoline.
Keep these habits in place:
• Keep fingers behind the apple and away from the peeling blade.
• Never touch the blade to test its sharpness.
• Stop turning before adjusting the apple.