How To Repair Vacuum Cleaner Motor Coil Damage Symptoms: DIY
Damaged motor coils often show burning smell, weak suction, buzzing, and motor stalls — repair or rewind.
I’ve spent years fixing home appliances and teaching DIY repairs. In this guide I’ll show how to spot and fix vacuum cleaner motor coil damage symptoms step by step. You’ll learn clear checks, safe repair choices, tools to use, and when it’s better to replace the motor. Read on to get confident and safe with vacuum motor coil issues.
Recognize symptoms of coil damage
A clear start is to know the signs. If you want to learn how to repair vacuum cleaner motor coil damage symptoms, begin with what you see and hear.
Common symptoms to watch for:
- Burning or hot smell — often ozone or burned insulation.
- Loud buzzing or humming — motor may spin poorly.
- Intermittent power or stalls — motor cuts out under load.
- Low suction despite a clean bag and filter — motor not reaching speed.
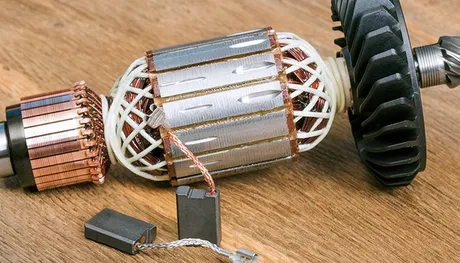
- Visible smoke or scorch marks around the motor housing — severe coil trouble.
Why these symptoms happen:
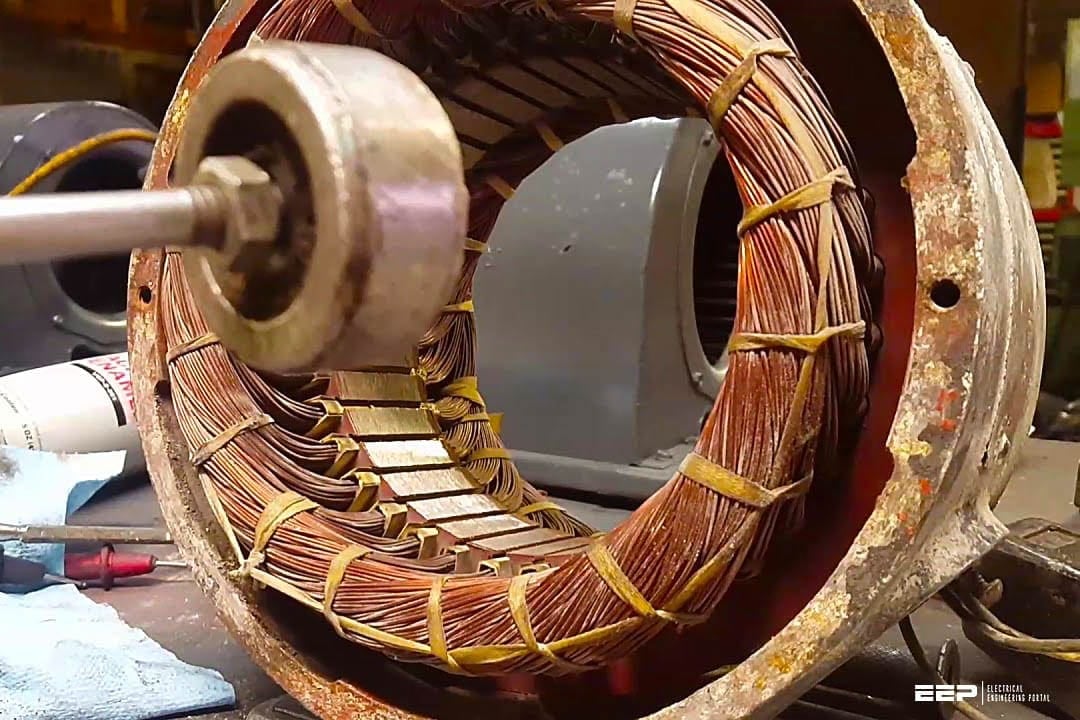
- Coil insulation can melt or crack from heat or overload.
- Shorted turns make the motor weak and noisy.
- Open windings stop current flow and cause stalls.
These are the first checks I run before disassembly. They help decide if you can fix the coil or need a new motor.

Safety, tools, and parts you’ll need
Safety first. Working on motors involves power and sharp parts. If you need guidance about how to repair vacuum cleaner motor coil damage symptoms, follow safety rules.
Essential safety steps:
- Unplug the vacuum and remove the battery if present.
- Work in a dry, well-lit area with a fire extinguisher nearby.
- Use insulated tools and wear safety glasses.
Basic tools and parts:
- Multimeter for resistance and continuity checks.
- Screwdrivers and pliers for disassembly.
- Soldering iron and heat-shrink tubing for wiring repairs.
- Fine sandpaper and contact cleaner for commutator work.
- Replacement motor or coil winding service if repair is not possible.
I keep a small kit at home. It saves a trip and helps me test fast.

Diagnose the motor and coils step by step
A clear test plan cuts guesswork. To know how to repair vacuum cleaner motor coil damage symptoms, you must first confirm the coils are the problem.
Step-by-step checks:
- Visual check — Inspect for burnt insulation, melted plastic, or debris.
- Smell test — A persistent burnt odor often points to coil damage.
- Continuity test — Use a multimeter to check each winding for continuity. Open winding shows infinite resistance.
- Resistance comparison — Measure resistance of windings. Large differences suggest shorted turns.
- Insulation test — A basic megger or a high-voltage test (done by pros) checks insulation integrity.
- Commutator and brush check — Worn brushes or dirty commutator can mimic coil failure.
If windings fail continuity or show very low resistance vs other windings, the coils are damaged and need repair or rewind.
How to repair: repair options and detailed steps
You have three paths when learning how to repair vacuum cleaner motor coil damage symptoms: clean and reconnect, rewind the coil, or replace the motor. Follow these steps based on the issue you found.
Option 1 — Clean, tighten, and rewire (for minor faults):
- Remove dust and debris from motor housing.
- Clean commutator with fine sandpaper and contact cleaner.
- Replace or reseat brushes and spring tension.
- Re-solder loose connections and insulate them.
Option 2 — Local repairs to windings (small damage):
- Expose the damaged turn and scrape back the varnish.
- Add a soldered jumper for a single damaged turn only if safe and practical.
- Re-varnish and bake the coil to restore insulation.
Option 3 — Rewind or replace (serious damage):
- Rewinding requires counting turns and matching wire gauge and insulation.
- Unless you have rewind tools and experience, send the armature or stator to a rewind shop.
- If rewind cost exceeds 50–70% of a new motor, replace the motor instead.
Detailed safety tip: never run the motor with exposed windings or poor insulation. That risks fire and more damage.
Testing, reassembly, and calibration
After repair, test carefully. Proper tests confirm success and prevent redo.
Testing steps:
- Reassemble motor housing loosely so cooling paths remain clear.
- With the vacuum unplugged, spin the motor shaft by hand to check bearings and clearance.
- Reinstall brushes but leave the housing open for an initial live test.
- Power on briefly while monitoring smell, sound, and vibration.
- Measure no-load RPM or voltage draw if you have the tools.
- If tests pass, fully reassemble and test under typical load.
If you still hear buzzing or see heat build-up, stop and reassess coils and brushes.
When to replace the motor instead of repair
Sometimes repair is not practical. If you want to know how to repair vacuum cleaner motor coil damage symptoms, also know when not to try.
Replace the motor if:
- The armature or stator has heavy burns or melted insulation.
- Bearings are seized or heavily worn.
- Rewind cost is close to or higher than a new motor.
- The vacuum is old and other failures are likely soon.
A new motor gives long-term reliability. For rented or complex units, replacement is often the best value.

Preventive maintenance to avoid future coil damage
Fixing coils is harder than preventing damage. Here’s how to cut risk and extend motor life.
Maintenance tips:
- Clean filters and bags often to reduce motor load.
- Avoid vacuuming large wet spots or hot ash.
- Replace brushes before they wear to metal.
- Keep vents and cooling paths free of lint.
- Use the right floor tools for the job to avoid blockage.
I learned this by replacing motors I could have saved with simple care. Regular checks save money.
Cost, time, and realistic expectations
Be honest about effort. Knowing how to repair vacuum cleaner motor coil damage symptoms helps you plan time and cost.
Typical time:
- Simple cleaning and brush change — 30 to 60 minutes.
- Diagnosis and minor wiring repair — 1 to 3 hours.
- Full rewind — days including shop turnaround.
Typical cost:
- Brushes and small parts — low cost.
- Professional rewind — moderate to high cost.
- New motor — moderate cost, often best value for older vacuums.
Weigh cost against the vacuum’s value. I tell clients that a rewind is worth it for high-end or specialty motors.
My experience and practical tips
I’ve repaired dozens of vacuums. One case stands out. A client had a faint burning smell and weak suction. I found a few shorted turns on the armature. A rewind restored the motor. The vacuum runs like new now.
Lessons learned:
- Start with simple fixes like brushes and filters.
- Don’t ignore a burnt smell — it gets worse if you delay.
- When unsure about windings, send them to pros.
Be patient and methodical. Small fixes often fix the problem.
Frequently Asked Questions of how to repair vacuum cleaner motor coil damage symptoms
What is the first sign of coil damage in a vacuum motor?
A burning smell and loud humming are early signs. Low suction and motor stalls often follow.
Can I rewind a vacuum motor at home?
Rewinding is complex and needs precise turn counts and insulation. It is best left to professionals unless you have proper tools and experience.
Are brush problems the same as coil damage?
No. Worn brushes or dirty commutators can mimic coil faults. Always check brushes first before condemning coils.
How long does a rewind take and how much does it cost?
A rewind can take a few days including shop work. Cost varies but can be moderate; compare with a new motor price.
Is it safe to run a vacuum with damaged coils?
No. Damaged coils can overheat and cause fire. Stop use and inspect the motor if you suspect coil damage.
Conclusion
You can diagnose and handle many vacuum motor coil issues with simple tests, the right tools, and safe work habits. Start by spotting symptoms like burning smells and buzzing. Check brushes and commutator before deciding on a rewind or replacement. When in doubt, use a professional for rewinds. Take action early to save money and avoid hazards. Try the simple checks today, and if you found this guide useful, leave a comment or subscribe for more repair tips.

Liora Pennings is a seasoned chef and kitchen enthusiast with a passion for turning everyday cooking into an effortless experience. With years of hands-on culinary expertise, she specializes in practical techniques, ingredient know-how, and smart kitchen solutions that help home cooks elevate their meals. At KitchFlair.com, Liora shares her best tips, time-saving tricks, and honest product reviews to guide readers toward a more efficient, enjoyable, and inspired cooking routine. Whether you’re a beginner or a seasoned home chef, Liora’s friendly, knowledge-packed insights make every visit to the kitchen a little easier—and a lot more delicious.