How To Make Coffee Art: Easy Latte Art Guide
To make coffee art, pour finely textured steamed milk into espresso with steady control and simple wrist movements.
Learning how to make coffee art is less about artistic talent and more about milk texture, timing, and practice. A smooth espresso base acts like a canvas, while glossy microfoam gives you the control needed to draw hearts, tulips, and rosettas. This guide explains the method baristas use, the mistakes that slow beginners down, and simple ways to improve each pour.
What Is Coffee Art?
Coffee art, often called latte art, is the design created when steamed milk meets the crema on top of espresso. The milk forms white shapes against the brown coffee surface. Common designs include hearts, tulips, rosettas, swans, and simple dots.
The key is not to draw on the coffee with a spoon. Instead, you control the flow of milk. The height of the pitcher, the pour speed, and the angle of the cup all change the final design.
Good coffee art needs three things:
• A strong espresso base with stable crema
• Smooth, shiny microfoam with tiny bubbles
• A controlled pour from a small pitcher
Coffee art is decorative, but it also shows technical skill. A clean pattern often means the barista has prepared the espresso and milk well.

Equipment You Need to Make Coffee Art
You do not need a full café setup to learn how to make coffee art. Better tools can help, but technique matters more than price.
Essential tools
• Espresso machine: Use a machine that can brew espresso and produce steam.
• Espresso grinder: Freshly ground coffee gives you better crema and flavor.
• Milk pitcher: A 12-ounce pitcher with a sharp spout works well for beginners.
• Espresso cup: Choose a wide cup with a rounded base. A 6- to 8-ounce cup is easy to control.
• Thermometer: This helps you learn the right milk temperature, though experienced baristas often use touch.
• Fresh milk: Whole milk is easiest because its fat and protein create stable foam.
• Clean cloth: Wipe and purge the steam wand after every use.
A narrow pitcher can make the milk stream easier to aim. A wide pitcher gives more room to create movement, but it may feel less precise at first.
Plant-based milk can also work. Barista-style oat milk is often the easiest non-dairy option. Almond and soy milk may foam well, but results vary by brand. Always check the carton, since some plant milks separate or create large bubbles when heated.
In my early practice, I focused too much on buying better tools. The real improvement came when I used the same pitcher and cup each day. Consistent equipment made it easier to notice small changes in my milk texture and pouring speed.

How to Prepare Espresso for Latte Art
A good espresso base gives your coffee art contrast and stability. The crema should look smooth and golden brown. If the shot is very thin or has little crema, the milk may sink instead of forming a clear design.
Start with fresh coffee beans and grind them just before brewing. A common starting point is about 18 grams of coffee for a double shot, producing around 36 grams of espresso. The exact dose and yield depend on your coffee, basket, and taste.
Follow these steps:
- Grind the coffee finely enough for espresso.
- Distribute the grounds evenly in the portafilter.
- Tamp with level, steady pressure.
- Lock in the portafilter and start the shot.
- Brew until the espresso looks balanced, not pale and watery.
- Swirl the espresso gently before pouring milk.
Many baristas use a brew time near 25 to 35 seconds as a starting point. This is not a strict rule. Taste matters more than a single number. If the shot tastes sour, bitter, or weak, adjust the grind and dose before blaming your coffee art.
Crema does not last forever. Prepare the milk soon after pulling the shot. If espresso sits too long, the surface may separate and become harder to use as a smooth canvas.
How to Steam Milk for Coffee Art
Milk texture is the heart of how to make coffee art. You want microfoam, not stiff foam. Microfoam feels like wet paint: smooth, glossy, and fluid.
Step 1: Add cold milk
Fill the pitcher to just below the start of the spout. This gives the milk enough room to expand without overflowing. Cold milk also gives you more time to create a smooth texture.
Step 2: Add air
Place the steam wand tip just under the milk surface. Open the steam fully. You should hear a soft paper-tearing sound.
That sound means air is entering the milk. If you hear a loud screech, the wand is too high. If you hear almost nothing, the wand is too deep.
Step 3: Create a whirlpool
Lower the pitcher slightly so the wand sits deeper in the milk. Tilt the pitcher to create a gentle whirlpool. This motion folds larger bubbles into the milk and creates a fine texture.
The milk should move like wet paint. Large bubbles mean the milk needs more rolling. Avoid tapping the pitcher hard, since this may break the foam instead of improving it.
Step 4: Stop at the right temperature
For most dairy milk, stop steaming around 140 to 150°F. Milk can still taste pleasant up to about 155°F, but overheating reduces sweetness and may create a cooked flavor.
For plant-based milk, follow the product’s instructions when available. Many barista-style products perform best when heated gently rather than pushed to a very high temperature.
Step 5: Polish the milk
Wipe and purge the steam wand. Then swirl the pitcher until the milk looks glossy and uniform. Pour it soon after steaming.
A practical lesson from repeated practice is simple: milk texture is easier to judge by movement than by appearance alone. If the milk sits in the pitcher and separates quickly, it is usually too foamy or not mixed enough.

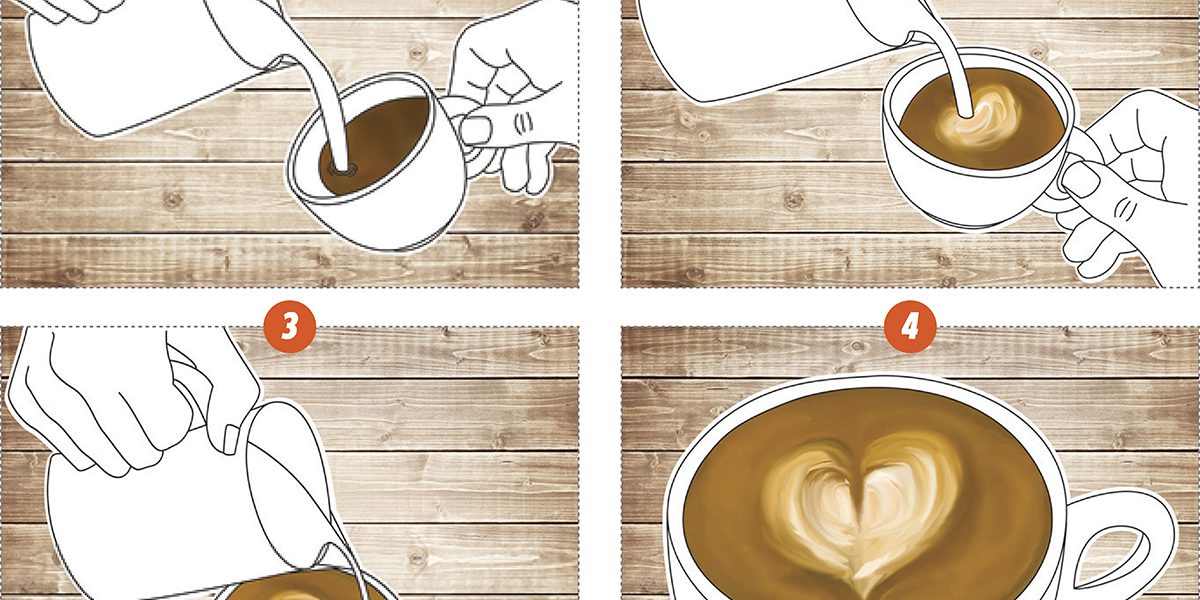
How to Make Coffee Art: The Basic Pour
Once your espresso and milk are ready, the pour begins. Work calmly. Fast movements often create messy designs.
- Swirl the espresso to spread the crema.
- Hold the cup at a slight angle.
- Start pouring from about 2 to 3 inches above the surface.
- Pour into the center with a thin stream.
- Keep the stream steady as the cup fills.
- Lower the pitcher close to the coffee when you want the milk to appear on top.
- Finish by lifting the pitcher and drawing through the design.
The high pour mixes milk into the espresso. The low pour places white foam on the surface. This change in height is one of the most important parts of how to make coffee art.
Keep your wrist relaxed. Most of the control should come from moving the pitcher with your hand and forearm. Do not force the design with sudden wrist turns.
Pouring is a little like writing with water. A slow, steady line gives you control. A rushed line spreads before you can shape it.
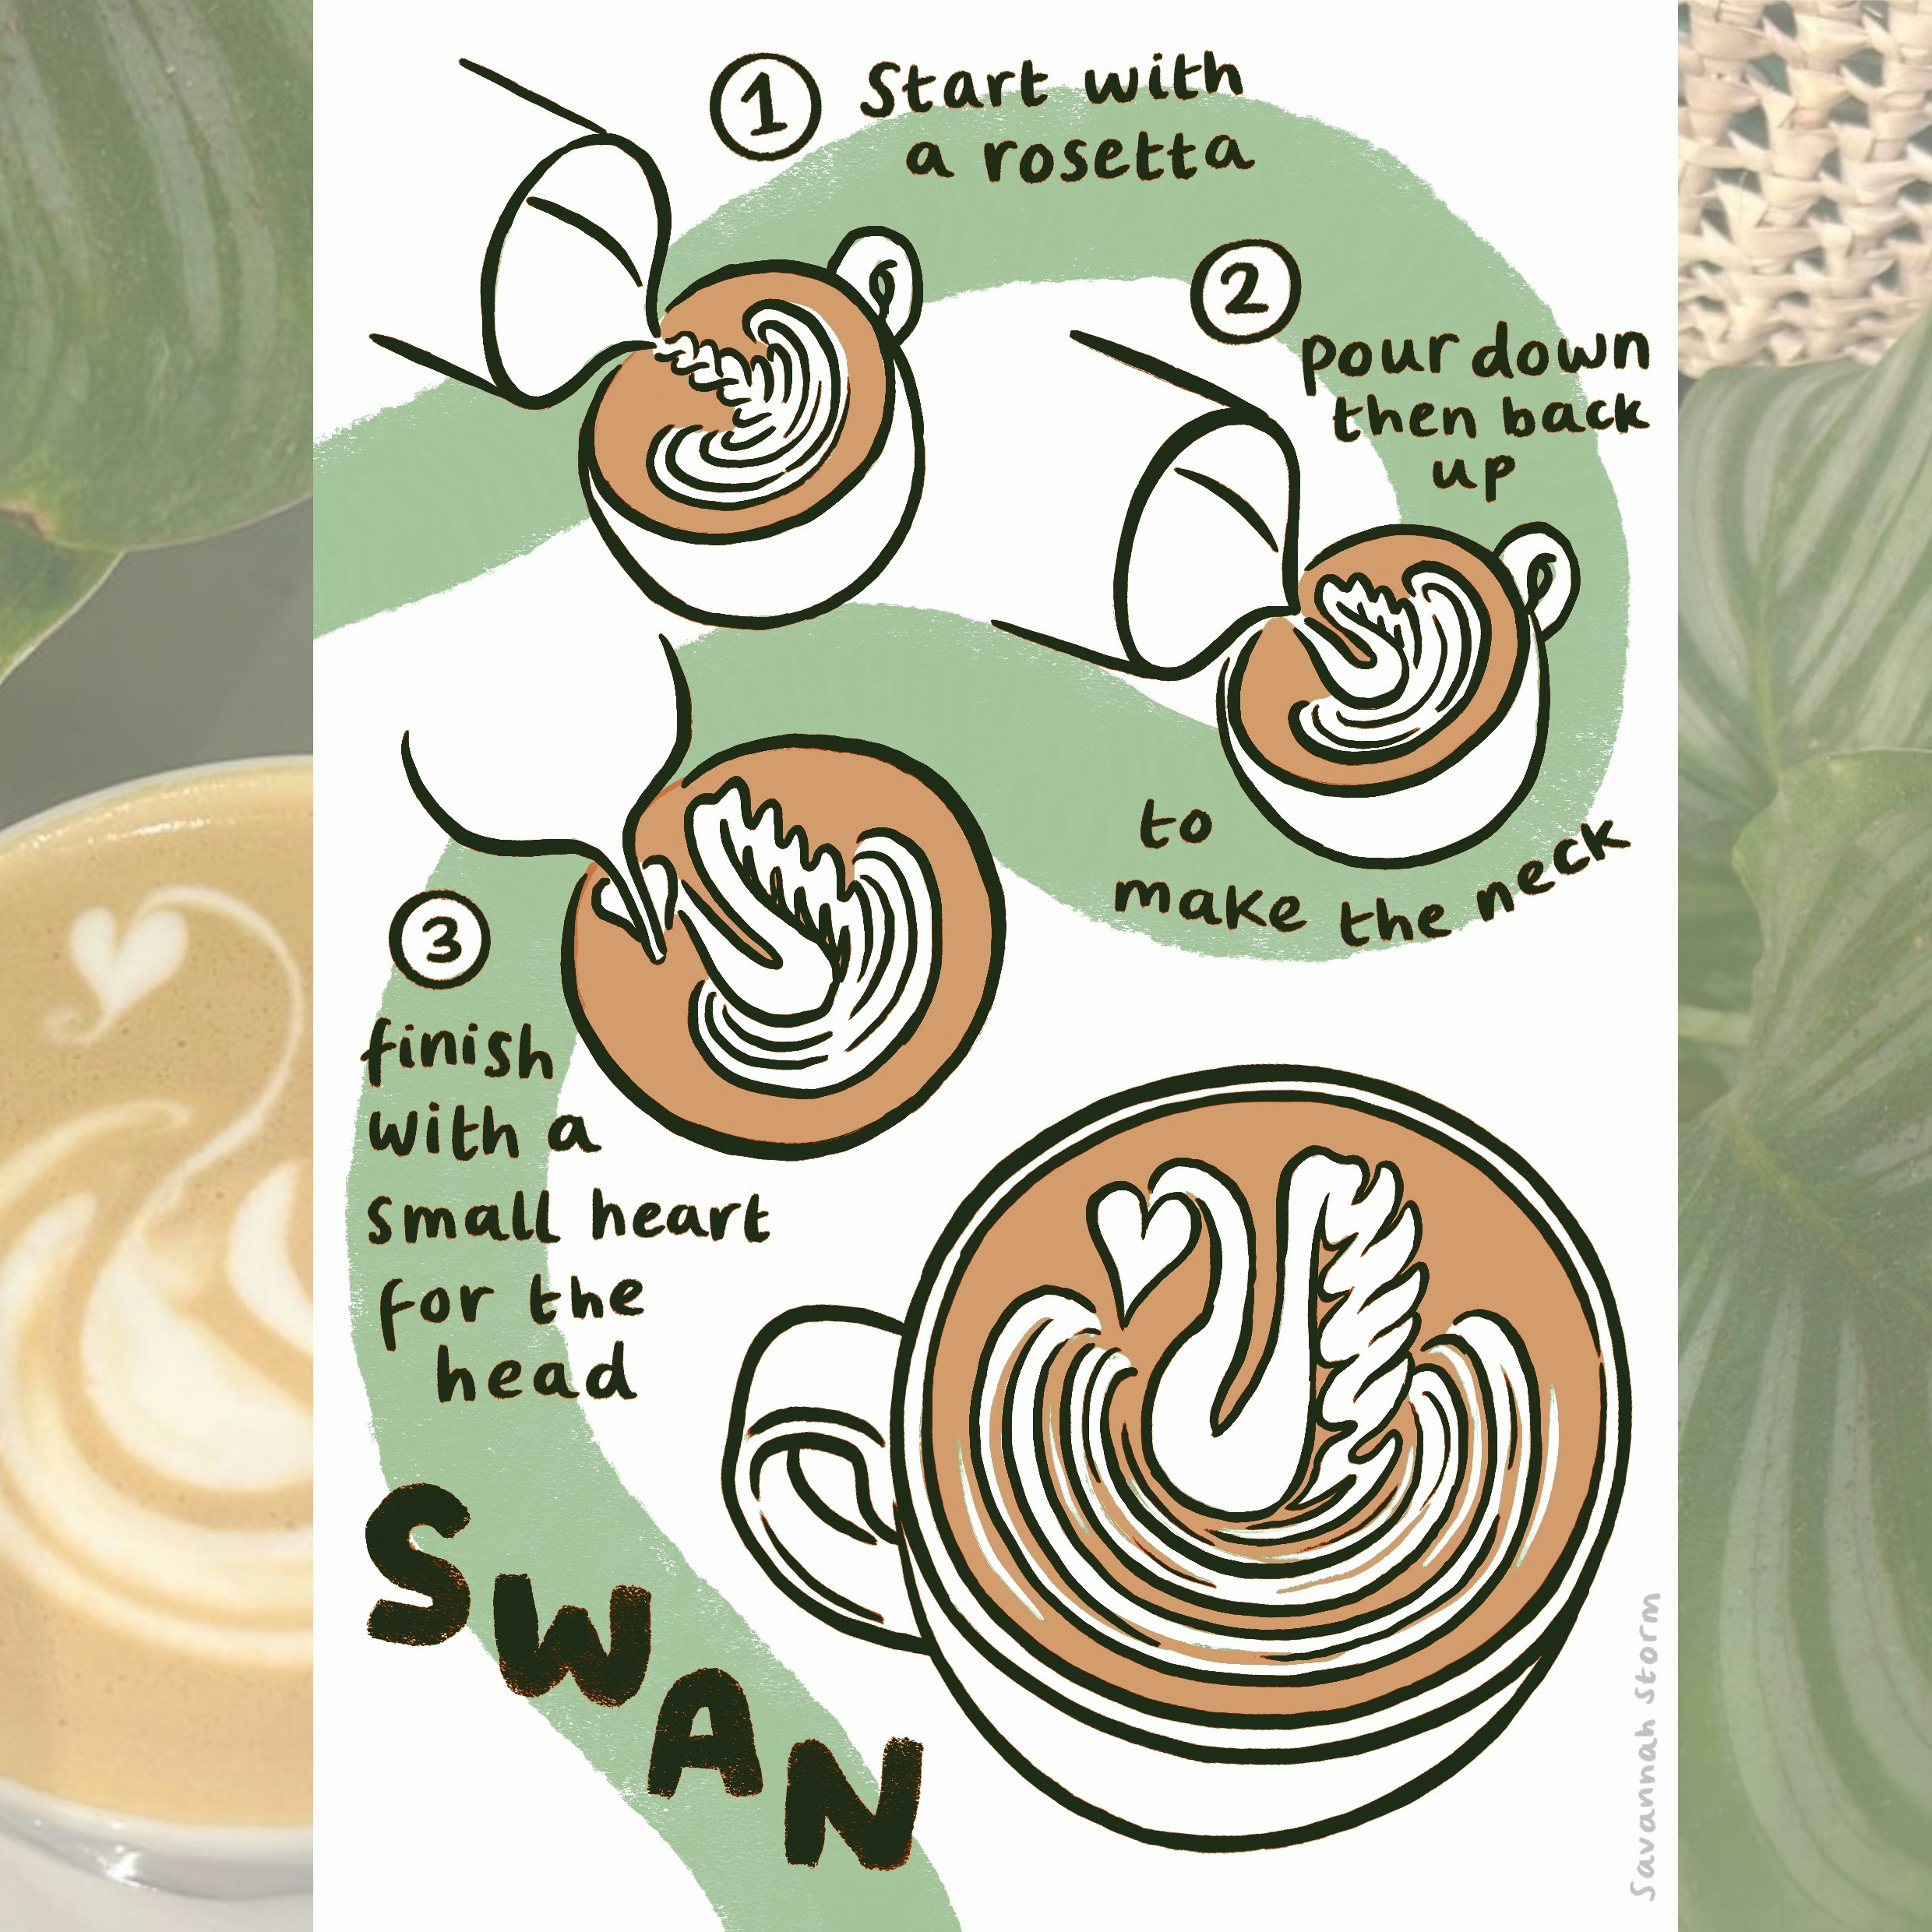
How to Make a Heart in Coffee
The heart is the best first design because it teaches the main skills used in more advanced patterns.
Heart method
- Begin with a high, thin pour in the center of the espresso.
- Keep pouring until the cup is about half full.
- Lower the pitcher close to the surface.
- Pour steadily into one spot.
- Watch the white foam expand into a round shape.
- Lift the pitcher slightly and pull a thin stream through the center.
- Stop pouring.
The final pull creates the point at the bottom of the heart. If the shape looks too small, lower the pitcher earlier and pour more milk. If it spreads too wide, reduce the flow or use slightly thicker milk.
A heart does not need to be perfect. A clear, balanced shape shows that your milk and pour are working well.

How to Make a Rosetta
A rosetta looks like a leaf or fern. It requires more hand movement than a heart, but the basic method remains simple.
- Start with a high pour to mix milk into the espresso.
- Move the pitcher close to the surface.
- Pour a steady stream near the far side of the cup.
- Move the pitcher gently from side to side.
- Let each movement create a curved layer.
- Finish by pulling a thin line through the center.
The side-to-side motion should be small at first. Large movements can make the pattern uneven. Keep the pitcher close to the surface, and let the milk flow rather than forcing it.
A rosetta often fails when the milk is too thick. Heavy foam sits in large clumps and does not create fine leaves. Thin, glossy microfoam gives you better detail.

How to Make a Tulip
A tulip is made from stacked shapes. It looks complex, but each part is a small heart or rounded pour.
- Start with a thin high pour.
- Lower the pitcher and pour one small white shape.
- Pause briefly.
- Pour a second shape just behind the first.
- Repeat with one or two more shapes.
- Pull through all the layers to finish.
The pause between layers helps the shapes stack instead of blending together. Use less milk for each section than you would use for a full heart.
The tulip teaches timing and flow control. If the layers merge, slow down and pause longer. If they look disconnected, use a slightly stronger stream.

Common Coffee Art Mistakes
Most beginners struggle with the same few problems. Finding the cause is more useful than simply practicing harder.
Large bubbles in the milk
This usually means the steam wand added too much air or stayed too high. Tap the pitcher gently, then swirl the milk to break up surface bubbles.
Milk sinks under the crema
The milk may be too thin, the espresso may have weak crema, or the pour may begin too high for too long. Lower the pitcher sooner and improve the milk texture.
The design looks pale
The espresso may have weak crema, or too much milk may have mixed into the base. Use a fresh shot and keep the early pour thin.
The pattern spreads too quickly
The milk may be too thin or too hot. A wide, fast pour can also flood the cup. Use a slower stream and stop before the cup becomes overly full.
The heart has no point
The finishing pull may be too high or too slow. Lift the pitcher slightly and move through the center with one clean motion.
The rosetta has no leaves
The milk may be too thick, or the pitcher may be moving too quickly. Practice small side-to-side movements with a thin, steady stream.
One mistake I see often is changing everything at once. Keep the same coffee, cup, pitcher, and milk while you practice. Change only one factor at a time so you can learn what caused the result.

A Simple Practice Plan
You can learn how to make coffee art without wasting many shots. Practice the motions with water and a small drop of dish soap first. The soap makes the liquid behave somewhat like foam and lets you repeat the pour without using coffee.
Try this routine:
• Day one: Practice holding and tilting the cup.
• Day two: Practice high and low pours with soapy water.
• Day three: Steam milk and focus only on texture.
• Day four: Make simple dots and circles.
• Day five: Practice hearts.
• Day six: Practice tulips or rosettas.
• Day seven: Review photos and adjust one weakness.
Take a photo from above after each attempt. A design can look good from the side but uneven from above. Photos help you compare shape, contrast, and symmetry.
Do not judge yourself by café videos. Many professional designs come from thousands of repetitions. Your first goal is not a perfect swan. It is repeatable milk texture and a controlled heart.
Coffee Art With Plant-Based Milk
You can make coffee art with plant-based milk, but each type behaves differently.
• Oat milk often gives a creamy texture and is beginner-friendly.
• Soy milk can create strong foam but may split if overheated.
• Almond milk may produce lighter foam and less body.
• Coconut milk can vary widely by brand and may separate.
• Barista-style versions usually contain stabilizers that improve steaming.
Use the same basic method, but add air gently. Plant-based milk may become grainy or separate when heated too quickly. Keep the steam wand clean and avoid overheating.
Taste is also important. Some plant milks add sweetness, while others bring nutty or cereal notes. Choose one that suits the espresso rather than choosing only by its foam.
The Science Behind Latte Art
Milk contains water, fat, proteins, and sugar. Steam adds heat and air. The proteins help surround air bubbles, while the fat contributes to a creamy mouthfeel.
When the bubbles are very small, the milk becomes microfoam. This foam can mix with espresso or sit on top of it, depending on the pour height and speed.
Espresso crema contains oils and carbon dioxide. It creates a thin surface that helps the milk pattern remain visible. Crema is useful, but it is not a guarantee of good coffee. A balanced espresso and well-textured milk matter more than appearance alone.
Temperature also affects flavor. Moderate heat brings out milk’s natural sweetness. Excessive heat can damage the texture and produce a flat, cooked taste. This is why many baristas avoid boiling milk.
Safety and Cleaning Tips
Steam wands and metal pitchers become very hot. Use care when steaming, and keep the wand pointed away from your hands and body.
Clean equipment after every drink:
• Wipe the steam wand immediately.
• Purge the wand for a few seconds.
• Rinse the pitcher after use.
• Flush the espresso group as directed by the machine maker.
• Clean old milk from the wand tip and pitcher spout.
Milk residue can harden quickly and may support bacterial growth. Good cleaning protects flavor, equipment, and health.
Never touch the steam wand tip right after use. If you are learning with children nearby, keep the machine and hot pitcher out of reach.
Frequently Asked Questions About How to Make Coffee Art
What milk is best for coffee art?
Whole dairy milk is usually the easiest choice because its fat and protein create smooth, stable microfoam. Barista-style oat milk is a strong plant-based option.
Can I make coffee art without an espresso machine?
It is difficult to create classic latte art without espresso because espresso provides crema and a concentrated base. You can still practice milk pouring over strong coffee, but the design may not have the same contrast or stability.
Why does my milk foam disappear?
The milk may be too thin, too hot, or poorly mixed. Steam it with a small amount of air, create a whirlpool, and pour soon after steaming.
How long does it take to learn coffee art?
Many people can create a basic heart after several practice sessions. Consistent designs usually take weeks or months, depending on how often you practice and how well you control milk texture.
What temperature should milk reach for latte art?
A useful range for dairy milk is about 140 to 150°F. Avoid boiling the milk, since excessive heat can damage flavor and create poor texture.
Why does my coffee art look blurry?
Blurry art often comes from thin milk, weak crema, or a pour that is too fast. Use glossy microfoam, a fresh espresso shot, and a slower, lower pour.
Conclusion
Learning how to make coffee art starts with the basics: fresh espresso, smooth microfoam, a suitable cup, and a steady pour. Begin with a heart, then build toward tulips and rosettas as your control improves. Practice one variable at a time, take photos, and treat every imperfect cup as useful feedback.
You do not need perfect equipment or natural artistic skill. Make your next cup, focus on the milk texture, and try one careful pour. Share your results or explore more barista guides as you continue improving.

Liora Pennings is a seasoned chef and kitchen enthusiast with a passion for turning everyday cooking into an effortless experience. With years of hands-on culinary expertise, she specializes in practical techniques, ingredient know-how, and smart kitchen solutions that help home cooks elevate their meals. At KitchFlair.com, Liora shares her best tips, time-saving tricks, and honest product reviews to guide readers toward a more efficient, enjoyable, and inspired cooking routine. Whether you’re a beginner or a seasoned home chef, Liora’s friendly, knowledge-packed insights make every visit to the kitchen a little easier—and a lot more delicious.