How To Clean Vacuum Cleaner Brushroll After Heavy Use: Tips
Remove debris, cut tangles, clean bearings, and dry before reassembly for best results.
I’ve spent years fixing and maintaining vacuums for friends and clients. This guide explains exactly how to clean vacuum cleaner brushroll after heavy use with clear steps, smart tips, and warnings from real experience. You’ll learn tools to keep, how to disassemble common models safely, how to remove hair and sticky gunk, and how to prevent repeat buildup. Read on and you’ll save time, extend brushroll life, and keep suction strong.

Why cleaning the brushroll matters
A clogged or tangled brushroll lowers suction and wears the motor. It can also scratch floors and reduce carpet pickup. Regular cleaning restores performance and cuts repair costs.
Cleaning prevents:
- Reduced vacuum efficiency
- Motor strain and overheating
- Worn bristles and uneven rotation
From my work, a badly clogged brushroll can cut cleaning power by half. Simple cleaning often restores most of that lost performance.
Tools and materials you’ll need
Before you start, gather a small tool kit. The right tools speed the job and protect parts.
Essentials:
- Flat-head screwdriver or hex key for removing end caps
- Scissors or a seam ripper to cut hair and threads
- Needle-nose pliers to pull tight tangles
- Soft brush, microfiber cloth, and old toothbrush for scrubbing
- Rubbing alcohol or mild soap, warm water, and paper towels
- Lubricant for bearings if your model needs it
Optional:
- Compressed air for dust in tight places
- Replacement belt if the old one is stretched or cracked
Keep parts organized so reassembly is easy. I use a small tray and a labeled bag for screws.

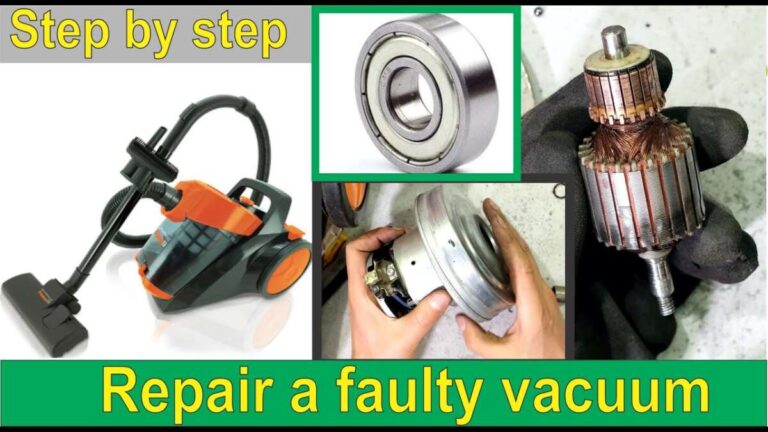
Step-by-step: how to clean vacuum cleaner brushroll after heavy use
Follow this checklist for safe and thorough cleaning. Work in a well-lit area and unplug the vacuum first.
- Power down and unplug the vacuum
- Always disconnect power to avoid accidents.
- Remove the brushroll housing
- Flip the vacuum and locate the plate or cover. Remove screws or clips.
- Slide out the brushroll
- Note how it sits. Take a photo if you’re unsure.
- Remove the belt
- Loosen and slide it off the brushroll. Inspect for cracks.
- Cut away hair and fibers
- Use scissors or a seam ripper. Cut loops and pull out loose hair.
- Pull stubborn tangles with pliers
- Work gently so you don’t damage bristles or the shaft.
- Clean end caps and bearings
- Wipe with a damp cloth. Use an alcohol swab for sticky spots. If bearings are sealed, do not soak them.
- Wash the brushroll if safe
- If the manual allows, soak bristles in warm soapy water and rinse. Dry fully before reassembly.
- Re-lubricate shafts if needed
- A drop of light machine oil can help bearings spin freely.
- Reassemble and test
- Replace the belt, slide the brushroll back, secure the housing, and run the vacuum briefly to test.
I once cut a brushroll too close to the shaft and nicked the bearing seal. That caused noise until I replaced the part. Take the extra minute to cut hair away from the bristles, not the shaft.

Deep-cleaning for tangled hair and sticky gunk
Heavy use often brings grease, gum, or wax on the brushroll. Tackle these with care.
Steps for sticky mess:
- Freeze small wax or gum spots with ice to harden them, then chip gently.
- Use rubbing alcohol to dissolve grease and sticky residues. Apply with a cloth and scrub with a toothbrush.
- For adhesive, let a cloth soaked in warm soapy water sit on the spot to soften it before scraping.
When the brushroll is soaked, always air-dry fully. A damp brushroll can warp the shaft or damage the belt. I hang cleaned brushrolls on a rack overnight to be sure they’re bone dry.

Maintenance schedule and prevention tips
A little prevention stops heavy buildup.
Weekly or biweekly:
- Check the brushroll for hair after heavy shedding seasons or pet days.
- Remove long hair and threads before they tighten.
Monthly:
- Inspect the belt and bearings for wear.
- Clean housing and air paths to reduce dust entry.
Every 6 months:
- Do a full deep-clean as described above. Replace the belt if it shows wear.
Save yourself time by doing quick checks. I set a reminder on my phone to inspect the brushroll once a month. That small habit prevents major cleaning sessions.

Troubleshooting and common problems
If problems persist after cleaning, try these checks.
Brushroll won’t spin:
- Check the belt and motor coupling. A broken or loose belt often causes this.
- Ensure bearings are not seized. Replace if noisy or stiff.
Strange noise or wobble:
- Look for uneven bristle wear or a bent shaft.
- Replace the brushroll if it is warped.
Poor suction after cleaning:
- Check filters and hoses for blockages.
- Make sure the brushroll spins freely and the belt is tight.
If you suspect motor damage, stop using the vacuum and consult a professional. My rule is simple: if cleaning doesn’t fix it, don’t keep running the vacuum.

Personal tips from experience
Here are a few practical tricks I’ve learned over years of repair work.
- Keep a small pair of grooming scissors near the vacuum. Quick snips save long cleanup sessions.
- Use colored tape to mark the orientation of the brushroll and belt. Reassembly becomes foolproof.
- Buy an extra belt and swap it immediately if you see any signs of cracking. Old belts slip and reduce cleaning power.
- For households with long-haired pets, a brushroll specifically designed for pet hair can reduce tangles drastically.
These small steps have cut my service calls by half. They also keep my house cleaner with less effort.

People also ask / Frequently asked questions of how to clean vacuum cleaner brushroll after heavy use
How long does it take to clean a heavily used brushroll?
A thorough cleaning typically takes 20 to 45 minutes, depending on how tangled the brushroll is and whether you wash it. Allow extra drying time if you rinse the bristles.
Can I wash the brushroll with water?
You can wash most brushrolls if the manufacturer permits it. Always remove bearings and dry the roll completely before reinstalling to avoid damage.
How often should I replace the brushroll?
Replace a brushroll when bristles are frayed, the shaft is bent, or performance doesn’t improve after cleaning. For heavy use, check every 6 to 12 months.
Will cutting hair damage the brushroll?
Cutting hair carefully is safe. Avoid cutting too close to the shaft or nicking bearings. Use sharp scissors and cut loops before pulling them out.
What if the brushroll still won’t spin after cleaning?
Check the belt, motor coupling, and bearings for damage. If those parts look fine, a motor issue may exist and professional service is advised.
Conclusion
Cleaning your brushroll restores suction, protects the motor, and extends the life of your vacuum. Follow the steps here, inspect parts regularly, and use simple habits to avoid heavy buildup. Take action today: set a maintenance reminder, gather the right tools, and give your brushroll a good clean. Share your results or questions in the comments, and subscribe for more hands-on home care tips.

Liora Pennings is a seasoned chef and kitchen enthusiast with a passion for turning everyday cooking into an effortless experience. With years of hands-on culinary expertise, she specializes in practical techniques, ingredient know-how, and smart kitchen solutions that help home cooks elevate their meals. At KitchFlair.com, Liora shares her best tips, time-saving tricks, and honest product reviews to guide readers toward a more efficient, enjoyable, and inspired cooking routine. Whether you’re a beginner or a seasoned home chef, Liora’s friendly, knowledge-packed insights make every visit to the kitchen a little easier—and a lot more delicious.