How To Clean Vacuum Cleaner Dust Chamber Properly: Tips
Clean the dust chamber every 1–3 months by emptying, wiping, and washing removable parts.
I’ve spent years fixing and maintaining vacuums for homes and small businesses. In this guide I’ll walk you through exactly how to clean vacuum cleaner internal dust chamber properly, step by step. You’ll get clear tools lists, safety tips, simple procedures, and real-life tricks I learned on the job. Read on and you’ll feel confident tackling your own dust chamber safely and effectively.

Why cleaning the internal dust chamber matters
A clean dust chamber keeps suction strong. It also stops odors, slows motor wear, and lowers allergy triggers. Learning how to clean vacuum cleaner internal dust chamber properly protects your machine and your air quality.
Common problems from a dirty chamber:
- Reduced suction that makes cleaning slower.
- Bad smells from trapped dust or damp debris.
- Faster wear on the motor and seals.
- More dust escaping into the room while you vacuum.
I’ve fixed many vacuums that only needed a proper chamber clean. In most cases a careful cleaning restored performance and delayed expensive repairs.

Definitions and basics you should know
Dust chamber
- The internal bin or compartment where dirt and debris collect.
- Can be sealed, bagged, or cyclonic depending on the model.
Filter vs dust chamber
- The dust chamber holds debris. Filters trap fine particles after the chamber.
- Cleaning the chamber alone won’t fully restore filtration but it’s the first step.
Types of chambers
- Bagless clear bin: easy to see and empty.
- Bagged system: replace the bag instead of cleaning the chamber.
- Canister or upright: layout varies, but the steps are similar.
Understanding these basics helps you choose the right cleaning steps and avoid damage.

Tools and materials you’ll need
Gather these items before you start. They keep the job fast and safe.
- Soft brush or old toothbrush for crevices.
- Microfiber cloths for wiping.
- Mild dish soap and warm water for washable parts.
- Compressed air can or small hand pump for tight spaces.
- Gloves and a dust mask to protect skin and lungs.
- Screwdriver set for models with fasteners.
- Replacement seals or gaskets if worn.
Having the right tools makes cleaning easier and prevents mistakes.
Step-by-step: how to clean vacuum cleaner internal dust chamber properly
Follow these short, clear steps. Read them once, then work through them slowly.
- Prepare and unplug
- Turn off and unplug the vacuum. Remove the battery if cordless.
- Move to a well-ventilated space or outdoors to avoid stirring dust inside your home.
- Empty the chamber
- Release the bin latch and dump debris into a trash bag or bin.
- Tap the chamber gently to release stuck bits. Avoid banging hard on hard surfaces.
- Remove washable parts
- Take out the dust bin, filters, and detachable gutters as your manual allows.
- Check seals and gaskets for cracks or loss of elasticity.
- Dry brushing and loose dust removal
- Use a soft brush to loosen stuck dust. Work around seams and ribs.
- Use compressed air in short bursts to clear tight spots. Hold the can upright.
- Wash washable parts
- Rinse removable bins with warm water and mild soap. Avoid hot water that may warp plastic.
- Do not put non-washable parts in water. Follow the manual.
- Clean filter housing and non-washable parts
- Wipe the housing with a damp microfiber cloth.
- Use a dry brush or compressed air for delicate motor and electrical areas. Never spray liquids onto motor parts.
- Dry completely before reassembly
- Air-dry parts fully. Use a towel for a quick dry, but let them sit until no moisture remains.
- Reinstall filters only when bone-dry to avoid mold and motor damage.
- Reassemble and test
- Refit parts, seals, and filters. Make sure latches click and seals sit flush.
- Turn on the vacuum and listen for normal operation. Check suction on a small patch of carpet.
This step-by-step routine shows how to clean vacuum cleaner internal dust chamber properly without risk.

Deep cleaning and filter care
Filters need attention when you clean the chamber. Good filter care extends life and performance.
Filter types and care
- Foam/pre-motor washable: rinse under warm water until clear, squeeze gently, air-dry fully before reinstalling.
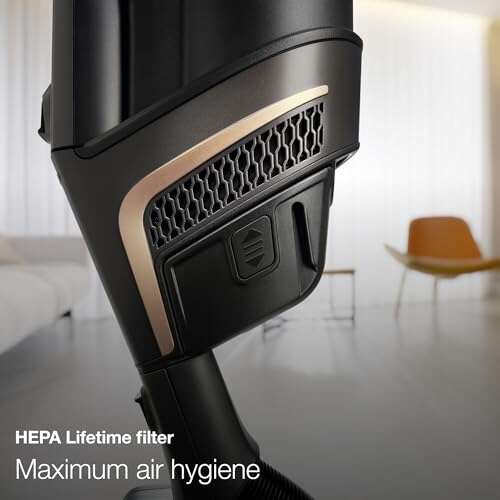
- HEPA or paper post-motor: tap gently to remove dust, replace if clogged or damaged—do not wash unless labeled washable.
- Carbon or odor filters: replace on schedule to control smells.
When to replace
- Replace filters if performance doesn’t return after cleaning.
- If a filter is torn, misshapen, or smells persistently, swap it out.
Personal tip: I write the date on a small piece of tape and stick it to the vacuum after filter changes. It helps me track filter life.

Common mistakes and how to avoid them
Avoid these errors I see often when people clean their dust chamber.
- Washing non-washable parts: this can ruin electronics or filters.
- Reassembling while parts are damp: this causes mold and motor damage.
- Using harsh cleaners: strong solvents can warp plastic or break seals.
- Skipping seal inspection: worn seals leak suction and reduce performance.
- Forcing parts: forcing clips or seals can break fragile latches.
Simple habits fix most problems: read the manual, work slowly, and keep parts dry.

Maintenance schedule and practical tips
Set a simple schedule so the task stays small and effective.
- Empty dust chamber after each heavy use or at least once a week for busy homes.
- Deep clean the chamber and washable filters every 1–3 months depending on use and pets.
- Replace HEPA or paper filters every 6–12 months or as the manual recommends.
- Inspect seals and brushrolls seasonally for wear and tear.
Small daily habits:
- Empty the bin before it gets fully full.
- Check the brushroll and suction path for hair and string to avoid clogs.
- Keep the vacuum stored upright and dry.
From my experience, regular light care saves time and money compared to infrequent deep cleaning.
Troubleshooting and when to seek professional help
If cleaning the dust chamber doesn’t restore suction or you hear odd noises, try these checks:
- Confirm filters are reinstalled correctly and dry.
- Check for clogs in the hose or intake path.
- Inspect the belt and brushroll for damage.
Seek professional help if:
- The motor smells burnt or the vacuum trips breakers.
- You find electrical damage or wet motor components.
- Repairs require special parts or internal motor work.
Professional service can be cheaper long-term than replacing a high-end unit.

Personal experience and lessons learned
I once serviced a vacuum that lost suction despite clean filters. The problem was a cracked seal inside the chamber. A simple seal replacement restored full power. That taught me to always inspect gaskets and latches.
A tip I use:
- Keep a small toolkit by the vacuum. A toothbrush, cloth, and spare filters make midweek care easy.
Mistakes I’ve made:
- Rushing reassembly with damp filters and then finding mold. Wait until fully dry.
Frequently Asked Questions of how to clean vacuum cleaner internal dust chamber properly
How often should I clean the dust chamber?
Clean the dust chamber weekly for heavy use and every 1–3 months for deep cleaning. Frequency depends on pets, allergies, and how often you vacuum.
Can I use water on all vacuum parts?
No. Only wash parts labeled washable. Avoid water near motors, belts, and non-washable filters to prevent damage.
What if my vacuum still smells after cleaning?
Check for trapped debris in hoses and inspect filters and foam for dampness. Replace odor filters or run a baking soda sprinkle on a carpet then vacuum to reduce odor.
Will cleaning the chamber improve suction immediately?
Yes, removing clogs and debris often restores suction instantly. If not, check filters, seals, and hoses for hidden blockages.
Is it okay to use compressed air to clean the chamber?
Short bursts of compressed air are fine for tight spots. Hold the can upright and avoid blowing dust into the motor or filter housing.
Conclusion
You now have clear steps and practical tips on how to clean vacuum cleaner internal dust chamber properly. Start with safety: unplug the unit, empty the bin, and separate washable parts. Clean filters correctly, inspect seals, and dry everything fully before reassembly. A short, regular routine keeps suction strong and extends the life of your vacuum. Try the schedule and tips listed here, and leave a comment with your model or a problem you want help with—I'd be glad to guide you.

Liora Pennings is a seasoned chef and kitchen enthusiast with a passion for turning everyday cooking into an effortless experience. With years of hands-on culinary expertise, she specializes in practical techniques, ingredient know-how, and smart kitchen solutions that help home cooks elevate their meals. At KitchFlair.com, Liora shares her best tips, time-saving tricks, and honest product reviews to guide readers toward a more efficient, enjoyable, and inspired cooking routine. Whether you’re a beginner or a seasoned home chef, Liora’s friendly, knowledge-packed insights make every visit to the kitchen a little easier—and a lot more delicious.