How To Repair Vacuum Cleaner Motor Overheating Under Load:
Fix most overheating motors by restoring airflow, replacing worn brushes, and repairing bearings or wiring.
I have spent years fixing household appliances and teaching technicians how to diagnose faults. If you want to learn how to repair vacuum cleaner motor overheating under load, this guide walks you through clear diagnostics, safe repairs, and smart decisions about replacement vs. repair. I’ll share step-by-step checks, real-world tips, and when to call a pro so you can stop guessing and get the motor running cool and reliable again.
Understanding why motors overheat under load
Motors get hot when they work. Overheating under load means the motor heats excessively only when the vacuum faces normal suction resistance. Causes range from easy fixes to serious electrical faults.
Common root causes
- Restricted airflow from clogged filters, bags, or hoses causes higher current draw.
- Worn carbon brushes or loose brush springs reduce contact and increase arcing and heat.
- Faulty bearings or seized brushroll increase mechanical load on the motor.
- Commutator wear, shorts in the windings, or damaged wiring raise electrical resistance and heat.
- Improper voltage or a failing capacitor (on motors that use one) can raise operating temperature.
Signs to watch for
- Burning smell during use.
- Motor shuts off after a few minutes or trips a breaker.
- Smoke, visible arcing, or unusually loud bearings.
- Reduced suction with the motor straining.
This section frames why you must treat overheating early. Fixing airflow issues often resolves overheating quickly, but electrical or mechanical problems need careful repair.

Safety first: tools, PPE, and pre-checks
Safety saves motors and fingers. Always disconnect power before opening a vacuum. Wear gloves and eye protection when working with motors and brushes.
Essential tools
- Multimeter for voltage, continuity, and resistance checks.
- Small vacuum-safe brush and compressed air for cleaning.
- Screwdrivers, pliers, and nut drivers sized for your model.
- Replacement brushes, bearings, belts, and thermal fuses as needed.
- Insulating tape and heat shrink for minor wiring repairs.
Pre-check routine
- Unplug the vacuum and remove the dust bin, bag, and filters.
- Let the motor cool if it was recently used.
- Remove debris from the brushroll and hose to avoid kicks back during testing.
Being methodical reduces risk and helps pinpoint causes of motor overheating under load.
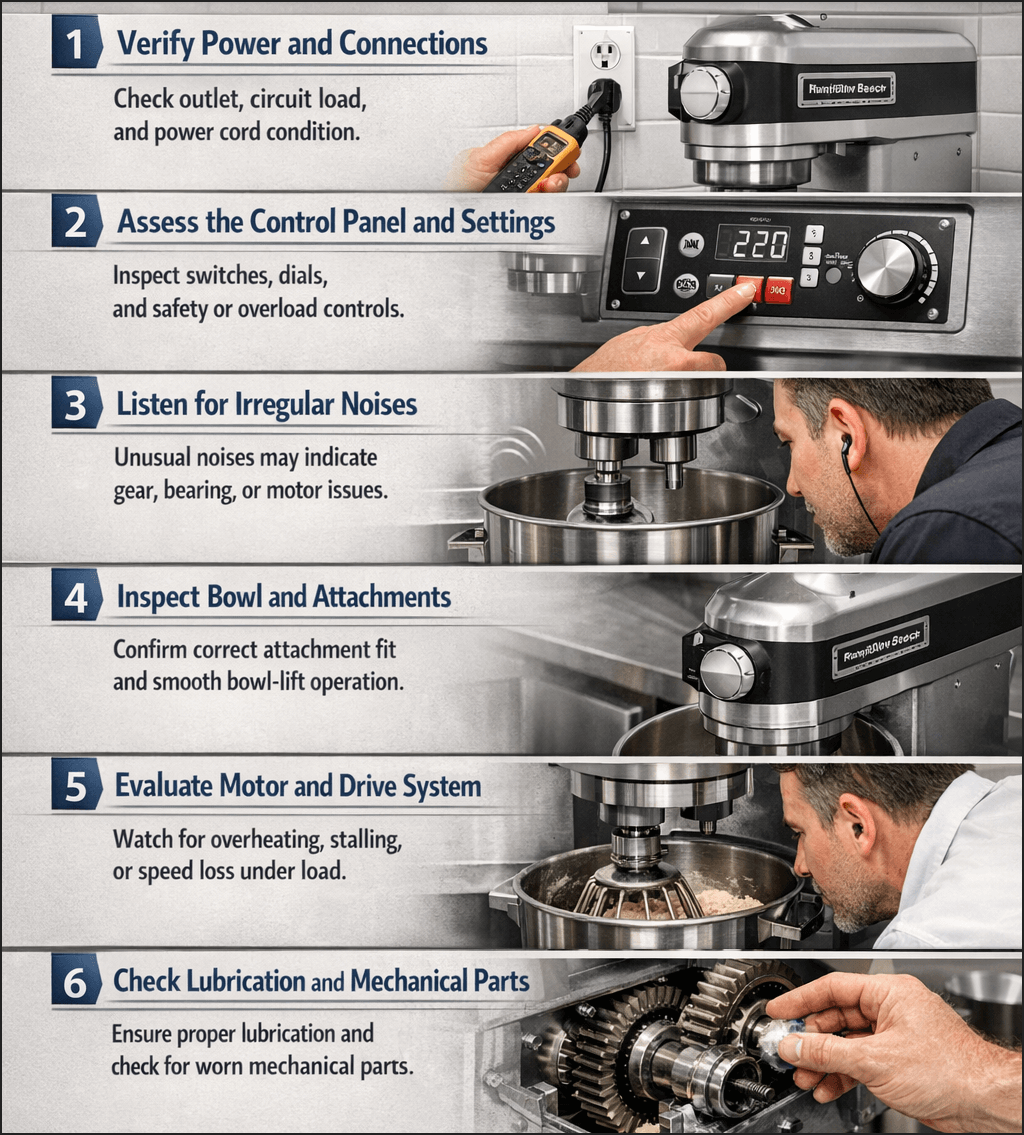
Step-by-step diagnostic checklist
Diagnose before replacing parts. Follow this checklist to find why the motor overheats under load.
-
Check airflow and intake
- Remove filters and empty the bin. Run the vacuum briefly with the hose disconnected (brief test) to see if the motor runs cooler.
- If overheating stops with open airflow, inspect filters, hoses, and the brushroll.
-
Inspect brushes and holder
- Remove the motor and inspect carbon brushes for wear (less than 5 mm of carbon needs replacement).
- Check springs and brush holders for proper contact and spring tension.
-
Check bearings and brushroll load
- Spin the motor shaft or brushroll by hand; it should turn freely without roughness.
- If it feels gritty or stiff, suspect bearings or brushroll obstruction.
-
Test motor windings and commutator
- Use a multimeter to check winding resistance against manufacturer specs. Large deviations indicate shorted or open windings.
- Inspect the commutator for pitting or deep grooves. Light burn marks can be dressed; severe damage needs professional service.
-
Inspect wiring and switches
- Look for burnt connectors, melted insulation, or loose crimped joints.
- Test the on/off switch for continuity and the thermal cutoff (if present) for open circuit.
-
Test under controlled load
- With filters removed, run the motor briefly to compare temperature and current draw.
- Measure current draw with a clamp meter if available; unusually high amps under nominal load indicate electrical or mechanical excess load.
This checklist helps you find the likely cause of motor overheating under load before spending money on parts.

How to repair common causes
Here are practical repair steps for the typical faults that cause a vacuum motor to overheat under load.
Filters, bags, and airflow blockages
- Replace disposable bags and foam/felt filters. Washable filters need full drying before reinstall.
- Clear clogs from hoses and tool connections with a broom handle or air pressure.
- Replace damaged seals and gaskets that create pressure drops.
Brushes and commutator
- Replace worn carbon brushes with OEM or exact-spec alternatives.
- Clean the commutator with a soft cloth and isopropyl alcohol. Lightly sand deep debris with very fine sandpaper if the motor is accessible.
- Realign brush holders if the brushes don’t seat squarely.
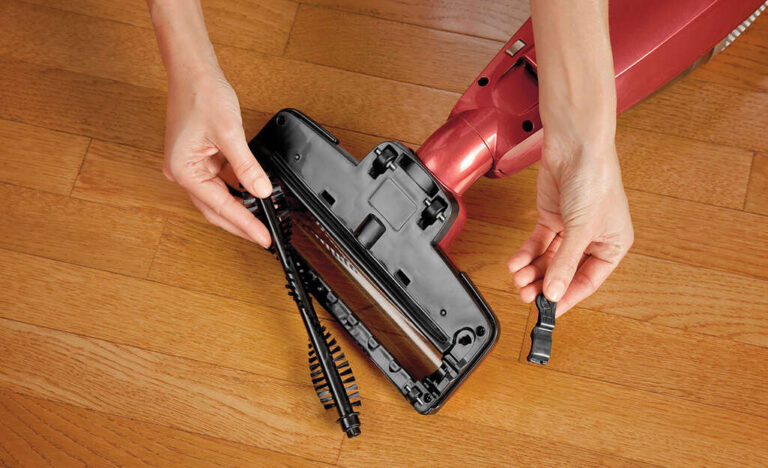
Bearings and brushroll issues
- Replace noisy, rough, or seized bearings. Some motors use pressed bearings requiring a press; others are plug-and-play.
- Replace or rebalance a damaged brushroll to lower mechanical drag.
Wiring, switches, and thermal protection
- Replace melted connectors and repair wiring with proper gauge wire and heat shrink.
- Replace a failed thermal cutoff or thermostat only with correct-rated parts.
- Replace faulty switches or capacitors that cause inefficient motor operation.
Windings and severe internal damage
- If windings show burning or shorted coils, repair means rewinding or replacing the motor. Rewinding is often cost-prohibitive for low-cost vacuums.
- When the armature is badly grooved or the motor spins with significant electrical noise, plan on motor replacement.
Repair tips
- Use exact-match parts. A brush with wrong length or spring weakness causes more heat.
- Keep repair sessions short and test the motor often to avoid damage from extended runs.
- For electrical uncertainty, consult a qualified technician.
Knowing when a simple part swap will cure overheating and when to replace the motor saves time and money.
Preventive maintenance to avoid overheating
Consistent care prevents many overheating problems. Simple habits keep the motor happy.
Weekly and monthly tasks
- Empty dust bins frequently and change bags as needed.
- Inspect and clean filters monthly or per the manual.
- Remove hair and debris from the brushroll weekly.
Annual checks
- Replace carbon brushes every 1–3 years depending on use.
- Check bearings and belts annually; replace worn belts to reduce load.
- Inspect internal wiring and connectors for heat damage.
Best practices
- Avoid vacuuming fine ash, large volumes of sand, or liquids unless the vacuum is rated for that task.
- Allow cooling time during heavy, prolonged use.
- Store the vacuum in a dry, cool place to avoid moisture damage to windings.
Routine maintenance reduces the chance you'll need to deal with how to repair vacuum cleaner motor overheating under load.

When to replace the motor or call a pro
Not all motor overheating problems are worth DIY repair. Use these guidelines to decide.
Signs to call a professional
- Burnt windings, smoking, or a smell that persists after cleaning.
- Motor requires rewinding or armature replacement.
- Complex diagnostics show intermittent electrical faults.
When replacement is better
- If motor repair cost is more than 50–70% of a new motor or vacuum cost.
- If the vacuum is older than 8–10 years and multiple components are worn.
Cost and time expectations
- Brush replacement and cleaning: low cost, low time.
- Bearing replacement or capacitor change: moderate cost and time.
- Rewinding or full motor replacement: high cost and longer turnaround.
Be honest with costs. Calling a trusted repair shop for an estimate helps you decide whether to repair or replace.
Parts, specs, and tools list
Here are the common parts and the specs to note when buying replacements.
Parts to keep on hand
- Replacement carbon brushes (match size and spring tension).
- Belts that match model specifications.
- Filters and dust bags specified for the model.
- Bearings matched by size or OEM number.
Tools and meters
- Multimeter (voltage, resistance).
- Clamp ammeter for current checks.
- Small press or bearing puller for bearings.
- Torque drivers or nut drivers for proper reassembly.
Buying tips
- Always match OEM part numbers when possible.
- Keep a photo of wiring before you disconnect parts.
- If unsure, buy parts from the vacuum’s manufacturer or verified aftermarket suppliers.
Having the right parts and tools makes repairing overheating issues faster and safer.

My experience: real fixes and lessons learned
I once fixed a heavy-duty vacuum that overheated in a busy workshop. The owner thought the motor needed replacement. I followed the diagnostic checklist and found clogged foam filters and worn brushes. After cleaning and replacing the brushes, the motor ran cooler and more quietly. Total cost was small compared to a motor swap.
Lessons I learned
- Start with the easiest checks first. Airflow and brushes are common culprits.
- Measure rather than guess. A quick current draw test saves wrong parts purchases.
- Keep spares for models you service often. It reduces downtime.
A few mistakes I made early in my career
- Rushing assembly and pinching wires. Always double-check routing.
- Reusing brushes with poor spring tension. Replace both brushes as a set.
These hands-on lessons cut repair time and keep clients happy. If you embrace methodical checks, you’ll master how to repair vacuum cleaner motor overheating under load quickly.

Frequently Asked Questions of how to repair vacuum cleaner motor overheating under load
How can I tell if the motor is overheating or just hot from use?
A motor that overheats usually smells burned, trips thermal cutouts, or shuts off. Normal heat feels warm but not painful to touch and does not produce smells or shutdowns.
Can I keep running the vacuum if it overheats under load?
No. Continuing to run a hot motor can cause permanent winding damage or fires. Turn it off, unplug, and diagnose the cause before reuse.
Are carbon brushes likely the main cause of overheating?
Yes, worn or weak carbon brushes are a common cause and easy to replace. If brushes are less than 5 mm or they don’t seat well, replace them.
Is motor rewinding a reasonable DIY repair?
No. Rewinding requires specialized equipment and skill. For most users, replacing the motor or hiring a professional is safer and cheaper.
How often should I replace filters and brushes to prevent overheating?
Filters should be checked monthly and replaced per the vacuum manual or sooner with heavy use. Brushes often need replacement every 1–3 years depending on workload.
Conclusion
You can often fix motor overheating under load with a clear diagnosis, basic tools, and the right replacement parts. Start by restoring airflow, inspecting brushes and bearings, and measuring current under load. For electrical winding damage, opt for professional repair or motor replacement. Take action: follow the checklist, make small fixes first, and schedule routine maintenance to avoid future overheating. If this guide helped, try one repair step today, subscribe for more tips, or leave a comment with your vacuum model and symptoms.

Liora Pennings is a seasoned chef and kitchen enthusiast with a passion for turning everyday cooking into an effortless experience. With years of hands-on culinary expertise, she specializes in practical techniques, ingredient know-how, and smart kitchen solutions that help home cooks elevate their meals. At KitchFlair.com, Liora shares her best tips, time-saving tricks, and honest product reviews to guide readers toward a more efficient, enjoyable, and inspired cooking routine. Whether you’re a beginner or a seasoned home chef, Liora’s friendly, knowledge-packed insights make every visit to the kitchen a little easier—and a lot more delicious.