How To Clean Vacuum Cleaner Cyclone Separator Step By Step: Quick Guide
Empty the cyclone, brush loose dust, wash if removable, dry fully, and reassemble carefully.
I’ve cleaned dozens of cyclone separators during repairs and routine maintenance. This guide gives clear, expert steps on how to clean vacuum cleaner cyclone separator step by step, with tools, safety tips, and common pitfalls. Read on for a practical, tested routine that keeps suction strong and parts lasting longer.
Why clean your cyclone separator regularly
A clean cyclone keeps suction high and stops dust from reaching the motor. When dust clogs the cyclone, airflow suffers and filters clog faster.
Cleaning also prevents odors and reduces wear on seals and plastic parts. Knowing how to clean vacuum cleaner cyclone separator step by step protects performance and extends the life of your machine.

How often to clean the cyclone separator
Light use: clean the cyclone every 1 to 3 months. Heavy use or pet homes: clean every 2 to 4 weeks.
If you notice loss of suction, more dust in the exhaust, or odd noises, clean the cyclone immediately. Following a schedule for how to clean vacuum cleaner cyclone separator step by step avoids emergency repairs.

Tools and materials you’ll need
- Soft brush or paintbrush for loose dust.
- Microfiber cloths for wiping surfaces.
- A small, soft-bristled toothbrush for crevices.
- Compressed air can (use sparingly) or a low-power compressor.
- Mild dish soap and a sink or bowl (only if parts are washable).
- Isopropyl alcohol (70%) for stubborn oily residues.
- Rubber gloves and safety glasses.
- Towel or drying rack and a clock or timer.
Step-by-step cleaning procedure
Follow these concise steps on how to clean vacuum cleaner cyclone separator step by step. Work slowly. Keep parts organized.
-
Safety first
- Unplug the vacuum or remove the battery.
- Wear gloves and glasses to avoid inhaling dust.
-
Remove the bin and empty
- Open the dust bin over a trash can.
- Tap gently to dislodge compacted dust.
- Remove and set aside the bin lid and filters.
-
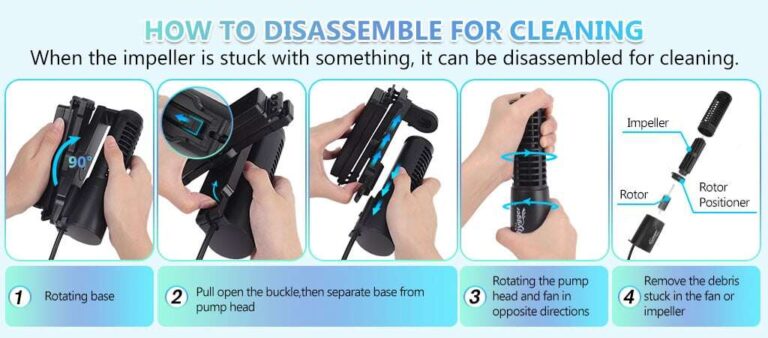
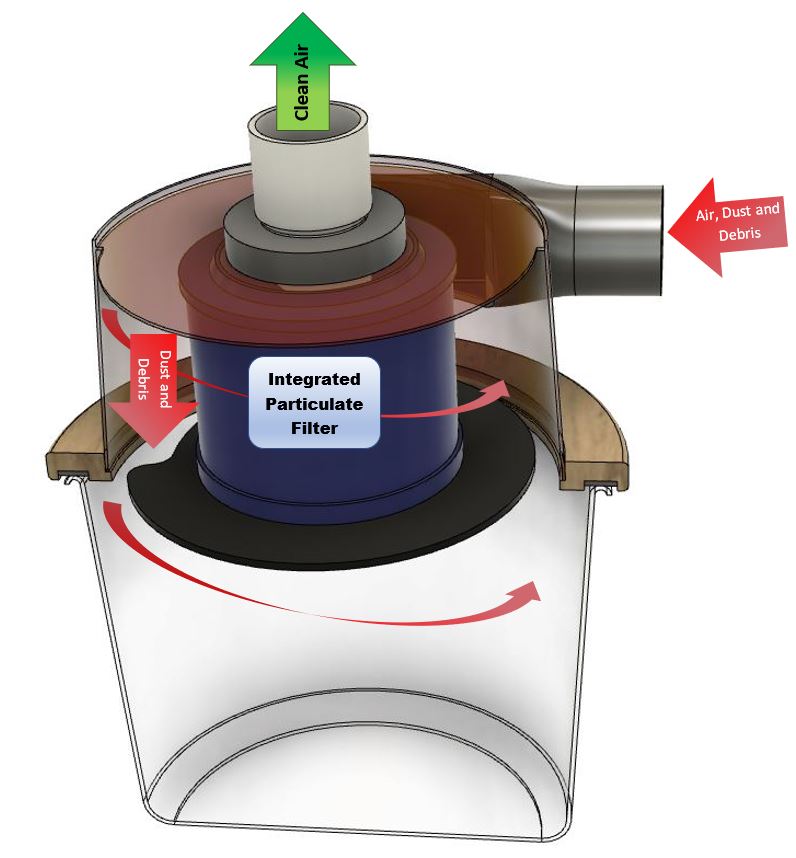
Access the cyclone
- Follow your model’s instructions to remove the cyclone cage or housing.
- Keep screws and small parts in a tray so nothing is lost.
-
Dry-clean loose dust
- Use the soft brush to sweep dust from the cyclone vanes and inner walls.
- Work top to bottom so dust falls into the bin area.
- Use a microfiber cloth to wipe visible dust from edges.
-
Use compressed air carefully
- Blow air from the clean to the dirty side, not deeper into the motor.
- Keep the can at least 6–8 inches away to avoid damage.
- Short bursts reduce the risk of dislodging fragile parts.
-
Wet clean if parts are washable
- Check your manual. If the cyclone parts are labeled washable, rinse with warm water and mild soap.
- Scrub gently with a soft brush on stubborn spots.
- Never submerge electrical parts or seals.
-
Remove oily or sticky residues
- For greasy build-up use a cloth dampened with isopropyl alcohol.
- Wipe gently and avoid prolonged soaking of plastic.
-
Dry completely
- Air-dry parts on a towel for 12–24 hours.
- Ensure every nook and seal is fully dry before reassembly to prevent mold and motor damage.
-
Reassemble and test
- Refit seals, filters, and the cyclone in the correct order.
- Run the vacuum briefly and check for strange noises or leaks.
- Confirm suction and dust separation have returned to normal.
I’ve had models where one loose O-ring ruined the seal and cut suction. Keep parts ordered as you disassemble. Practically every time I followed these steps I restored full suction within minutes. Knowing how to clean vacuum cleaner cyclone separator step by step makes reassembly fast and painless.

Deep cleaning and maintenance tips
Keep a spare set of pre-filters on hand so you can clean one while using the other. Replace foam or HEPA filters on the schedule the manufacturer recommends.
Avoid harsh solvents like acetone or strong degreasers. They can warp plastics and damage seals. If seals look brittle, replace them rather than trying to repair. Regularly inspect the cyclone for hair wraps around the central core and cut them away with scissors. These small checks complement how to clean vacuum cleaner cyclone separator step by step and reduce future clogs.

Troubleshooting and common mistakes
Problem: Loss of suction after cleaning
- Check for a misaligned seal, unseated filter, or a wet part causing blockage. Re-seat parts and dry them fully.
Problem: Water inside the motor
- Never run the vacuum until all parts are fully dry. If water reached the motor, have the unit inspected by a technician.
Common mistake: Using high-pressure air directly into crevices
- High pressure can push dust into the motor or damage plastic. Use short, gentle bursts.
Common mistake: Skipping filter maintenance
- Filters trap fine dust. Clean or replace them on schedule to get full benefit from how to clean vacuum cleaner cyclone separator step by step.
Frequently Asked Questions of how to clean vacuum cleaner cyclone separator step by step
How long does the cyclone need to dry after washing?
Allow at least 12 to 24 hours of air drying. Ensure no moisture remains in corners or under seals before reassembly.
Can I use soap on every cyclone separator?
Only wash parts if the manual says they are washable. Mild soap is fine for approved plastics; avoid solvents and harsh cleaners.
Will cleaning the cyclone improve suction immediately?
Yes, removing dust and blockages often restores suction right away, but filters must also be clean for full performance.
How can I tell if a seal needs replacing?
Look for cracks, flat spots, or hardening. If the seal no longer compresses, it should be replaced to maintain suction.
Is compressed air safe to use on the cyclone?
Use compressed air sparingly and from a distance. Short bursts work; avoid high pressure that can force dust into sensitive areas.
Conclusion
Regular care keeps your vacuum running well. Learn how to clean vacuum cleaner cyclone separator step by step, stick to a routine, and check filters and seals often. Small, consistent maintenance saves money and keeps your home cleaner. Try this method on your next cleaning cycle, leave a comment about your results, or subscribe for more hands-on appliance tips.

Liora Pennings is a seasoned chef and kitchen enthusiast with a passion for turning everyday cooking into an effortless experience. With years of hands-on culinary expertise, she specializes in practical techniques, ingredient know-how, and smart kitchen solutions that help home cooks elevate their meals. At KitchFlair.com, Liora shares her best tips, time-saving tricks, and honest product reviews to guide readers toward a more efficient, enjoyable, and inspired cooking routine. Whether you’re a beginner or a seasoned home chef, Liora’s friendly, knowledge-packed insights make every visit to the kitchen a little easier—and a lot more delicious.