How To Lubricate Vacuum Cleaner Motor Bearings Properly: Go
Use a few drops of light machine oil on accessible bearings, rotate the rotor, and reassemble carefully.
I’ve worked on dozens of vacuums and motor bearings. This guide shows exactly how to lubricate vacuum cleaner motor bearings properly with clear steps, safe tips, and real-world advice. You’ll learn which lubricants to use, how to spot sealed bearings, what to avoid, and when it’s better to replace parts. Read on to save time, money, and your motor.
Why lubricate vacuum cleaner motor bearings properly?
Lubricating bearings reduces friction and heat. That keeps the motor running smooth and extends its life. Doing the job properly prevents over-oiling, dirt buildup, and premature failure.
Signs you need lubrication include unusual noise, a hotter-than-normal motor, reduced suction, or a grinding sound. Some bearings are sealed and cannot be lubricated. Knowing the difference is key to doing the job right.
Regular lubrication lowers repair costs. It also improves efficiency and reduces energy use. When you learn how to lubricate vacuum cleaner motor bearings properly, you stop small issues from turning into motor failure.
Tools and materials you’ll need
- Light machine oil or bearing oil (thin, low-viscosity)
- Small syringe, oil can with a thin spout, or dropper
- Soft cloths and cotton swabs
- Small screwdriver set and pliers
- Compressed air or a soft brush for cleaning
- Safety gloves and eye protection
- Small container to hold screws and parts
Having the right tools makes the process fast and safe. If you expect to do multiple repairs, a basic vacuum motor tool kit is worth buying.
Types of lubricants and which to use
- Light machine oil or sewing machine oil: Best for exposed sleeve or plain bearings. Thin and clean.
- Low-viscosity bearing oil: Made for small electric motors. Works well for most consumer vacuums.
- Silicone lubricants: Good for plastic bushings but avoid thicker silicone greases on metal bearings.
- White lithium or moly grease: Use only for heavier duty bearings, not small motor bearings unless manufacturer recommends.
- Avoid WD-40 as a long-term lubricant. It’s a solvent and not a proper bearing oil.
If you are unsure, use a thin, non-detergent oil designed for electric motors. The wrong grease can trap dust and cause overheating. When in doubt, check the vacuum manufacturer’s guidance on how to lubricate vacuum cleaner motor bearings properly.
Step-by-step: how to lubricate vacuum cleaner motor bearings properly
- Safety first
- Unplug the vacuum and let it cool. Work in a well-lit, clean area.
- Access the motor
- Remove the screws and housing carefully. Keep parts organized.
- Inspect bearings
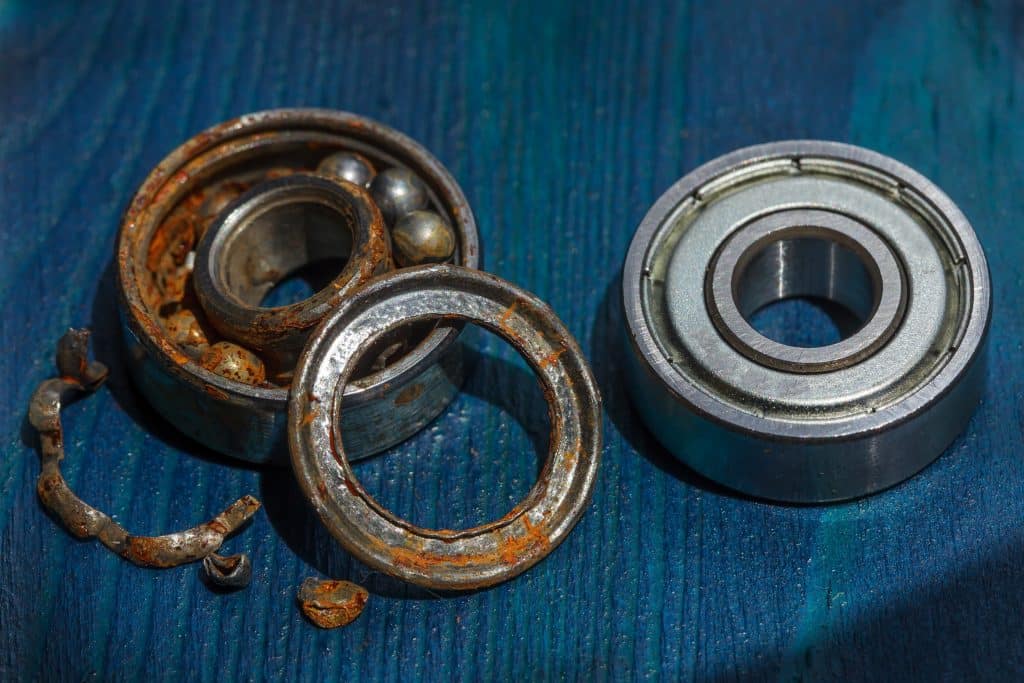
- Look for sealed caps or rubber covers. If sealed, do not force oil in. Sealed bearings are replacement-only.
- Clean around the bearings
- Use compressed air and a cloth to remove dust and debris. A clean surface prevents contamination.
- Apply lubricant
- Put 2–4 drops of light machine oil on each accessible bearing. Use a dropper or syringe for control.
- Work the oil in
- Spin the rotor gently by hand 10–15 revolutions to distribute oil evenly.
- Wipe excess oil
- Remove any drips. Excess oil can attract dust and gunk.
- Reassemble and test
- Put the motor housing back together. Run the vacuum for a few minutes and listen for smooth operation.
A tip from my shop: use a single, small drop at first. I once over-oiled a motor and had to clean the stator because oil migrated. Less is safer. Learning how to lubricate vacuum cleaner motor bearings properly saved me time and parts after a noisy motor call.

Safety tips and maintenance schedule
- Always unplug before working on a motor. Electricity and moving parts are dangerous.
- Wear eye protection when using compressed air.
- Keep oily rags away from heat sources to avoid fire risk.
- Maintenance schedule
- Light-use home vacuums: check bearings every 12 months.
- Heavy-use or commercial units: inspect every 3–6 months.
- Listen for noise and feel the motor housing for heat; these signs trigger an immediate check.
Follow the manufacturer’s service intervals when available. Proper, periodic care prevents major repairs and teaches you how to lubricate vacuum cleaner motor bearings properly before issues start.

When to replace bearings instead of lubricating
- Loud grinding or metal-on-metal noise often means worn races or balls.
- Excessive play or wobble in the rotor indicates wear.
- Sealed bearings with a factory cap are not designed for relubrication.
- If heat or burn marks exist, replacement is safer than oiling.
Replacing bearings may cost more up front. But it avoids repeated fixes and possible stator damage. If you are unsure, consult a technician or the manufacturer’s guidance on how to lubricate vacuum cleaner motor bearings properly versus replacing them.

Common mistakes to avoid
- Over-oiling the bearing and motor housing. Too much oil attracts dirt.
- Using the wrong lubricant such as penetrating oil or solvent sprays.
- Forcing oil into sealed bearings. This damages seals.
- Skipping cleaning before oiling. Dirt mixed with oil causes wear.
- Not rotating the rotor after lubrication. That leaves oil unevenly distributed.
Avoiding these mistakes keeps repairs effective and extends motor life. I learned early that careful, small steps are better than rushing.

Frequently Asked Questions of how to lubricate vacuum cleaner motor bearings properly
How often should I lubricate vacuum motor bearings?
For most home vacuums, check and lubricate accessible bearings every 12 months. Heavy-use units need attention every 3–6 months.
Can I use WD-40 to lubricate bearings?
No. WD-40 is a solvent and temporary cleaner, not a long-term lubricant. Use light machine oil or a bearing-specific oil instead.
How do I know if bearings are sealed?
Sealed bearings typically have metal or rubber caps and no visible oil access points. If you see a sealed cap, plan to replace the bearing rather than oil it.
What if the motor still hums after lubrication?
A humming motor can mean electrical issues, worn brushes, or bad bearings. If sound doesn’t improve after lubrication, stop and inspect other parts or get professional help.
Is it safe to lubricate the motor myself?
Yes, if you follow safety steps: unplug the vacuum, use the right tools, and avoid sealed bearings. If unsure, consult a technician.
Conclusion
You can prevent many motor failures by learning how to lubricate vacuum cleaner motor bearings properly. Use the right oil, clean first, apply small drops, and rotate the rotor to spread lubricant. Check bearings regularly and replace sealed or worn bearings when needed.
Take action this week: inspect your vacuum, mark a maintenance date, and try a safe lubrication on an accessible bearing. Share your results or questions below and consider subscribing for more hands-on repair tips.

Liora Pennings is a seasoned chef and kitchen enthusiast with a passion for turning everyday cooking into an effortless experience. With years of hands-on culinary expertise, she specializes in practical techniques, ingredient know-how, and smart kitchen solutions that help home cooks elevate their meals. At KitchFlair.com, Liora shares her best tips, time-saving tricks, and honest product reviews to guide readers toward a more efficient, enjoyable, and inspired cooking routine. Whether you’re a beginner or a seasoned home chef, Liora’s friendly, knowledge-packed insights make every visit to the kitchen a little easier—and a lot more delicious.