How To Test Coffee Maker Thermostat With Multimeter: Guide
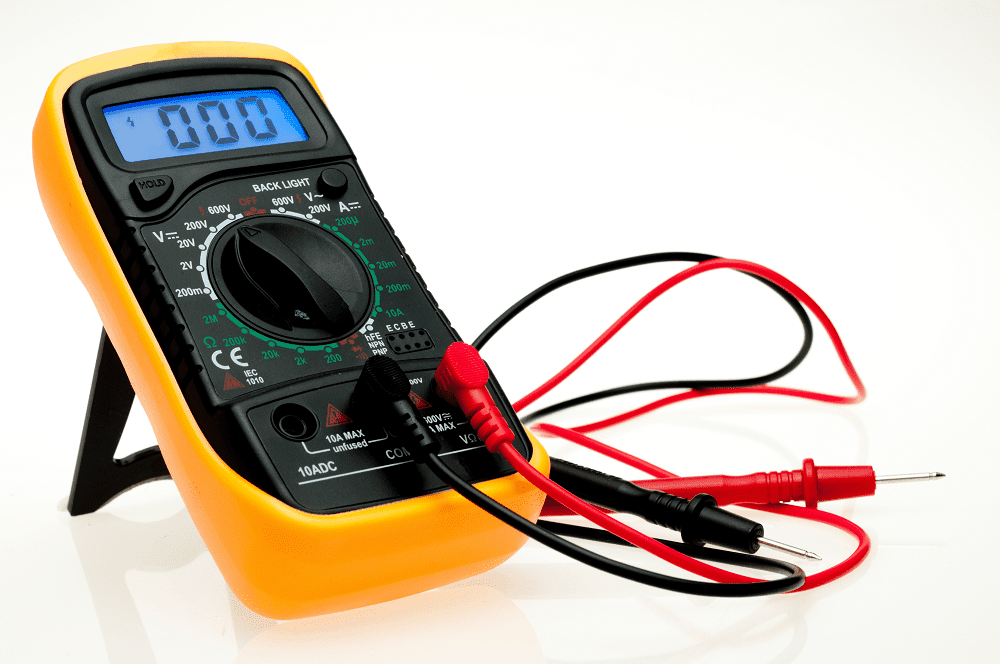
Use a digital multimeter to check continuity and resistance across the thermostat—look for stable ohm readings or an open circuit.
I’ve tested dozens of small appliances and coffee makers over the last decade. This guide will teach you how to test coffee maker thermostat with multimeter in clear, safe steps. You will learn what the thermostat does, when to test it, the tools you need, step-by-step testing, how to read results, and what to do next. I’ll share real tips from my bench work to help you fix or diagnose your brewer fast.
Tools and safety checklist before you begin
Safety first. Unplug the coffee maker before opening it. Wait until it cools. Use gloves if you like.
Tools you will need:
• Digital multimeter set to continuity or ohms.
• Small screwdriver set to open case screws.
• Needle-nose pliers or tweezers for wire handling.
• Insulating tape or wire connectors for safe reassembly.
• Thermal paste or replacement thermostat if you plan to swap parts.
Safety tips:
• Always unplug the unit and drain water.
• Discharge any capacitors by leaving unplugged for several minutes.
• Work on a dry, nonconductive surface.
• Note wire positions with photos so you can reassemble correctly.

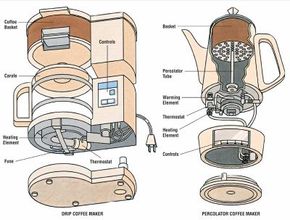
What is the coffee maker thermostat and why it matters
A thermostat in a coffee maker controls water temperature. It tells the heater when to turn on or off. A bad thermostat gives wrong temps or no heat at all.
Common thermostat types:
• Mechanical bimetal thermostats that open or close with heat.
• Thermal fuses and thermostats with fixed cutoff temperatures.
• Electronically controlled sensors in high-end brewers.
Knowing how to test coffee maker thermostat with multimeter helps you tell if the thermostat or the heater or the control board is at fault. This saves time and money.
When you should test the coffee maker thermostat
Test the thermostat if:
• The brew stays cold or never heats properly.
• The heater runs non-stop and overflows or boils.
• The coffee maker trips breakers or shows error codes.
• You replaced the heating element but the problem remains.
Start testing after you rule out simple things like blown fuses, broken power cords, or obvious corrosion. Testing the thermostat is often the next logical step.

Step-by-step: how to test coffee maker thermostat with multimeter
Follow these steps slowly and safely.
Step 1: Unplug and prepare
- Unplug the coffee maker.
- Remove the water and let it cool.
- Take photos of wiring for reference.
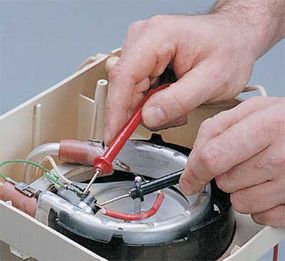
Step 2: Open access to the thermostat
- Unscrew the base or access panels.
- Locate the thermostat near the heating element or water tank.
- Identify its terminals and how wires connect.
Step 3: Visual and simple checks
- Look for burns, corrosion, or melted plastic.
- Gently wiggle connectors—loose wires can mimic thermostat failure.
Step 4: Set your multimeter
- Set it to continuity mode if available.
- If no continuity mode, set to lowest ohms scale.
Step 5: Test at room temperature (normally closed thermostat)
- Place one probe on each thermostat terminal.
- A working normally closed thermostat will show near 0 ohms or beep in continuity mode.
- A reading of OL or infinite ohms means open circuit—possible bad thermostat.
Step 6: Test heating action (for bimetal or thermostat that opens at temperature)
- Reheat the area carefully with a hair dryer or by powering the heater briefly with caution.
- Observe the multimeter: the thermostat should open (no continuity) at its set point.
- If it never changes state, it’s faulty.
Step 7: Test thermal fuse or cutoff
- Thermal fuses are one-time devices; test them with continuity.
- No beep means the thermal fuse blew and must be replaced.
Step 8: Record readings and reassemble
- Note resistance and continuity results.
- Reassemble or replace the part as needed.
How to interpret your multimeter readings
Reading the meter is simple. Keep answers short.
If you get near 0 ohms or a continuity beep:
• The thermostat is closed and likely working at room temp.
• For thermostats that should be open at room temp, this is a fail.
If you get OL or infinite resistance:
• The thermostat is open and not conducting.
• It may be blown or trapped open.
If the thermostat changes state when warmed:
• It is functional and actuates near its set temperature.
If the thermal fuse shows open:
• Replace the thermal fuse; it cannot be reset.
If results are ambiguous:
• Test the heater element and control board next.
• Cross-check with manufacturer specs for resistance values.
Common faults, causes, and simple fixes
Common issues you’ll find when testing:
• Stuck closed thermostat: heater never turns off. Fix by replacing thermostat.
• Open thermostat or blown thermal fuse: no heat. Replace the faulty component.
• Corroded connectors: intermittent heat. Clean or replace connectors.
• Faulty heater: correct thermostat but no current through heater. Test heater resistance.
Replacement tips:
• Use exact-spec parts when you replace a thermostat or thermal fuse.
• Match temperature cutoffs and terminal types.
• Keep wiring lengths and routing the same.

Real-life tips, mistakes to avoid, and personal notes
From my bench work:
• Always photograph wiring before disconnecting. It saves time and stress.
• Many people mistake a blown heater for a thermostat problem. Test both.
• Don’t apply too much heat during testing. You can damage sensitive sensors.
Mistakes to avoid:
• Testing while unit is still plugged in. This is risky.
• Assuming a closed reading means the whole system is fine. It only checks continuity.
• Buying the cheapest replacement. Cheap parts fail fast.
Testing the thermostat with a multimeter is quick. With good photos and careful notes, you can fix most issues in under an hour.
Maintenance and prevention to keep your thermostat working
Simple care extends life:
• Descale your coffee maker regularly to avoid scale on sensors.
• Clean electrical contacts and drying with a cloth.
• Replace thermal fuses and thermostats when you replace heating parts.
Periodic checks:
• Test continuity yearly if you depend on the brewer daily.
• Keep records of resistance values to spot drift over time.

Frequently Asked Questions of how to test coffee maker thermostat with multimeter
How can I tell if my coffee maker thermostat is bad?
A bad thermostat often causes no heat or continuous heat. Use a multimeter; open circuit or no state change when heated shows a bad thermostat.
Can I test the thermostat without opening the coffee maker?
You must open the case to access thermostat terminals for a safe read. External tests are not reliable and may be unsafe.
What multimeter setting is best for this test?
Use continuity mode or the lowest ohms setting. Continuity gives a clear beep for closed circuits and is easiest for beginners.
What resistance value should I expect from a working thermostat?
Many thermostats show near zero ohms when closed. Exact values vary by design, so compare to manufacturer specs when possible.
If the thermostat passes, what should I test next?
If the thermostat is okay, test the heating element for expected resistance and check the control board for proper voltage delivery.
Conclusion
Testing your coffee maker thermostat with a multimeter is a simple, cost-effective way to diagnose heating problems. You now know the tools, safety steps, tests, and how to read results. Start with careful unplugging, take photos, use continuity or ohms mode, and replace parts only when required. Try a test on a spare unit or practice safely; fixing small appliances builds useful skills and saves money. If this helped, share your results, ask a question below, or subscribe for more step-by-step appliance repair guides.

Liora Pennings is a seasoned chef and kitchen enthusiast with a passion for turning everyday cooking into an effortless experience. With years of hands-on culinary expertise, she specializes in practical techniques, ingredient know-how, and smart kitchen solutions that help home cooks elevate their meals. At KitchFlair.com, Liora shares her best tips, time-saving tricks, and honest product reviews to guide readers toward a more efficient, enjoyable, and inspired cooking routine. Whether you’re a beginner or a seasoned home chef, Liora’s friendly, knowledge-packed insights make every visit to the kitchen a little easier—and a lot more delicious.