How To Repair Cracked Vacuum Cleaner Plastic Housing: Fixes
Clean, bond, and reinforce the crack using plastic welding or epoxy for a durable fix.
I have fixed many small appliances in my workshop. I will walk you through how to repair cracked vacuum cleaner plastic housing with clear steps, plain tools, and proven methods. I explain causes, tools, step-by-step repairs, safety tips, and when to replace parts. Read on to save money and keep your vacuum working longer.

Understanding the crack: causes and what to check
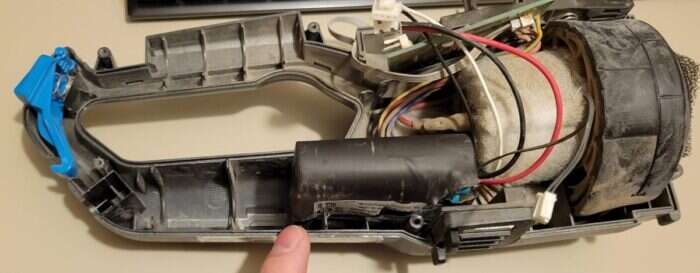
A cracked vacuum cleaner plastic housing can start small and get worse fast. Stress, impact, heat, and brittle plastics are common causes. Age and sun exposure also make plastic weak. Check the crack size, location, and whether it goes through ribs or mounts. These details decide if you can repair the part or need a replacement.
Tools and materials you will need
Collecting the right tools saves time and gives a better result. You do not need a full shop for most repairs. Here are common items that I use again and again:
- Utility knife or small saw to clean edges and remove loose plastic.
- Sandpaper in 80, 120, and 220 grits for rough and fine sanding.
- Plastic welding kit or soldering iron with a plastic welding tip.
- Two-part epoxy formulated for plastic and metal.
- Plastic-specific adhesives and surface activator/primer.
- Fiberglass cloth and resin for large holes.
- Clamps, tape, or rubber bands to hold parts while curing.
- Protective gloves, mask, and eye protection.
Choosing the right glue or welding rod matters for durable results. I keep a small kit in my garage for quick fixes.
Step-by-step repairs: method selection and detailed steps
Pick the best method based on crack type and location. I share four reliable repair methods below. Each method works for specific situations when you learn how to repair cracked vacuum cleaner plastic housing correctly.
Method 1 — Plastic welding (best for load-bearing areas)
Plastic welding fuses plastic and is strong when done right.
- Clean the area with soap and water. Dry well.
- Trim jagged edges and undercut slightly to form a V groove.
- Heat a plastic welding rod that matches the housing material or use a filler rod.
- Melt the rod into the groove and push melted plastic to fill the crack.
- Smooth the bead and blend with a flat metal tool while warm.
- Sand gradually from 80 to 220 grit for a neat finish.
Plastic welding works well on polypropylene and ABS if you match materials. Practice on scrap plastic first to avoid making the crack worse.
Method 2 — Two-part epoxy with reinforcement (good for most plastics)
Epoxy is easy and provides strong bonds for many plastics.
- Roughen surfaces with 80–120 grit sandpaper to improve adhesion.
- Clean with isopropyl alcohol and let dry.
- Mix the epoxy per directions. Add filler if you need gap fill.
- Apply epoxy across the crack and press the parts together.
- Add a small strip of fiberglass or mesh over the wet epoxy for strength.
- Clamp or tape until fully cured. Sand and paint if desired.
This method is great for mid-size cracks and areas that do not take heavy stress.
Method 3 — Fiberglass patch for large holes
Use fiberglass when a crack is actually a missing chunk.
- Trim ragged plastic and sand around the hole.
- Cut fiberglass cloth to overlap the repair by at least 1 inch on all sides.
- Mix resin and hardener. Apply a thin layer of resin around the hole.
- Lay in fiberglass and saturate with resin until smooth.
- Add a second layer for strength if needed.
- Once cured, sand and finish with filler and paint.
Fiberglass gives a rigid, load-bearing repair. It adds weight but is very durable.
Method 4 — Temporary fixes and quick sealing
For a temporary fix or while waiting for parts, use these quick steps.
- Clean and dry the area.
- Use a strong tape or plastic adhesive as a stopgap.
- Avoid running the vacuum on high power if the housing is compromised.
- Schedule a permanent repair soon to prevent motor damage.
Temporary measures help prevent debris from reaching the motor until you complete a full repair.
Finishing touches and cosmetic repairs
After a structural fix you can make the housing look better and last longer.
- Sand smooth with 120 and 220 grit sandpaper to remove high spots.
- Use plastic filler or automotive putty to refine the surface.
- Prime with a plastic primer and finish with spray paint made for plastic.
- Replace bolts and clips if they are stripped or damaged.
A neat finish prevents moisture and dirt from hitting the repair. I always hide repairs behind clips or seams when possible for a tidy look.

Safety and precautions
Safety keeps the job simple and low risk.
- Work in a well-ventilated area when using resin, epoxy, or paint.
- Wear gloves and eye protection at all times.
- Avoid inhaling fumes from heated plastic or adhesives.
- Disconnect power and remove batteries from the vacuum.
- Test small patches first if you are unsure about compatibility.
If you feel unsure about a repair, stop and ask a pro. Some plastics give off harmful fumes when heated.

Tips for long-term durability and prevention
A good repair lasts when you reinforce and maintain the vacuum.
- Reinforce weak spots with added material or ribbing on the inside.
- Avoid dropping the vacuum and store it in a cool place.
- Replace worn clips and mounts that put stress on the housing.
- Clean the vacuum and remove debris that can cause hotspots.
- Inspect repaired areas regularly and touch up as needed.
I learned to add a thin internal patch behind common stress points. That added 3–5 years to many machines I fixed.

When to replace the housing or call a pro
Sometimes repair is not the best choice.
- The crack is near moving parts or electrical components.
- The housing is severely broken into many pieces.
- Repairs would cost more than buying a replacement shell.
- You are not comfortable using heat or strong chemicals.
If the repair would compromise safety or the vacuum motor, get a replacement or professional help. A proper fix must keep the motor and wiring safe.

Frequently Asked Questions of how to repair cracked vacuum cleaner plastic housing
Can any plastic housing be welded?
No. Some plastics like PVC and polyethylene weld well. Others like certain nylons need special rods. If unsure, test a small scrap or use epoxy.
How long does a repair take?
Small cracks can take 30–90 minutes. Large repairs with fiberglass and finishing can take several hours plus cure time. Cure time depends on materials used.
Will epoxy hold under stress?
Yes, when you use a plastic-compatible epoxy and add reinforcement. For heavy stress areas, plastic welding or fiberglass gives more strength.
Can I use super glue on a vacuum shell?
Super glue works for tiny hairline cracks but often fails under vibration. Use epoxy or welding for lasting results.
Is it safe to run the vacuum after repairing the housing?
Yes, if the repair is fully cured and rigid. Make sure no repair materials touch moving parts or wiring and that seals are tight.
How do I find the plastic type of my vacuum housing?
Look for recycling codes or model specs. If none are present, a small burn test by a pro or manufacturer info can tell you. When in doubt, use epoxy or seek advice.
Conclusion
Repairing cracked vacuum cleaner plastic housing is doable with the right method, tools, and care. You can save money and extend your vacuum’s life by using plastic welding, epoxy, or fiberglass patches based on the damage. Start by assessing the crack, pick a repair suited to the plastic and stress level, and follow safety steps. Try a small practice weld or epoxy test if you are new to this work. Take action today: inspect your vacuum, gather the right supplies, and make a plan to fix or replace the housing. Share your repair story or ask a question below to get tailored advice.

Liora Pennings is a seasoned chef and kitchen enthusiast with a passion for turning everyday cooking into an effortless experience. With years of hands-on culinary expertise, she specializes in practical techniques, ingredient know-how, and smart kitchen solutions that help home cooks elevate their meals. At KitchFlair.com, Liora shares her best tips, time-saving tricks, and honest product reviews to guide readers toward a more efficient, enjoyable, and inspired cooking routine. Whether you’re a beginner or a seasoned home chef, Liora’s friendly, knowledge-packed insights make every visit to the kitchen a little easier—and a lot more delicious.