How To Fix Vacuum Cleaner Air Leak In Hose Connection: Tips
Tighten, clean, patch, or replace the hose connection to stop the air leak quickly.
I’ve repaired dozens of vacuums in my own shop and at home, so I’ll walk you through exactly how to fix vacuum cleaner air leak in hose connection with clear steps, simple tools, and real troubleshooting tips. You’ll learn how to find the leak, which fixes work best, when to replace parts, and how to test the repair so your vacuum regains full suction fast.
Why hose connections leak and what to expect
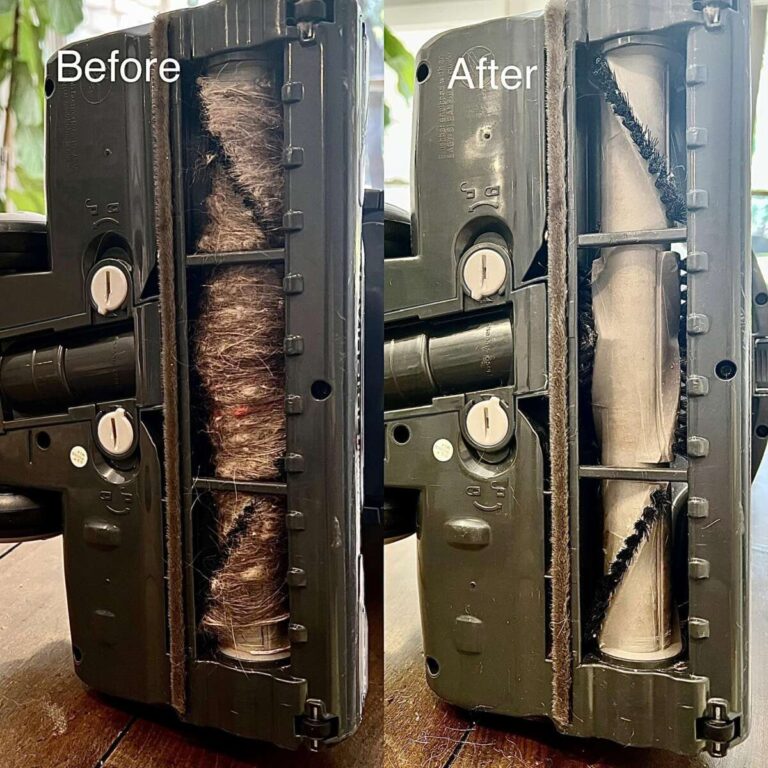
A hose connection leak cuts suction and causes poor cleaning. Most leaks happen at the cuff, swivel, or where the hose meets the wand or motor housing. Small tears, loose clamps, hardened seals, and warped fittings are common causes.
Knowing the cause helps you choose the right fix. A loose cuff needs tightening. A torn hose needs patching or replacement. Understanding simple causes makes how to fix vacuum cleaner air leak in hose connection much easier and faster.

Tools and materials you’ll need
Gather these quick items before you start. They keep the job fast and safe.
- Screwdrivers
- Pliers
- Utility knife or scissors
- Silicone sealant or rubber adhesive
- Duct tape and electrical tape
- Hose repair kit or replacement cuff
- Clamps (worm-drive style)
- Compressed air or a small fan for testing
Having the right tools makes how to fix vacuum cleaner air leak in hose connection straightforward. I always keep a small repair kit on hand for quick fixes.
Step-by-step guide: how to fix vacuum cleaner air leak in hose connection
These steps are proven and simple. Follow them in order.
-
Inspect and localize the leak
- Plug the vacuum in and run it briefly.
- Move your hand slowly along the hose and connections to feel for weak suction or air flow.
- Listen for whistling or hissing. For small leaks, hold a damp tissue near joints to spot movement.
-
Disconnect and clean the connection
- Unplug and remove the hose.
- Clean both ends with a damp cloth to remove dust and hardened debris.
- Check the cuff, O-ring, and seals for cracks or missing pieces.
-
Tighten loose fittings
- If the cuff is loose, tighten any screws or clamps.
- Use a worm-drive clamp for plastic-to-plastic joints to get a snug seal.
- A snug fit often solves how to fix vacuum cleaner air leak in hose connection without further work.
-
Patch small tears
- For hairline cracks, wrap a few layers of electrical tape, then cover with strong duct tape.
- Apply rubber adhesive or silicone across the tear for a longer-lasting fix.
- Press and let cure as instructed.
-
Replace the cuff or seal
- If the cuff or O-ring is warped, buy a matching replacement or universal repair kit.
- Fit the new cuff and secure with a clamp. This step often ends persistent leaks.
-
Replace the hose when necessary
- If the hose has multiple tears or severe internal damage, install a new hose.
- Match diameter and connection type for compatibility. Replacing a bad hose stops most stubborn leaks.
Each step focuses on practical fixes that I’ve used on real machines. Following these will show you how to fix vacuum cleaner air leak in hose connection reliably.

Testing, sealing tips, and fine adjustments
After repairs, test and finalize the seal.
- Turn on the vacuum and check suction at the floor head.
- Use a damp tissue at joints to find residual leaks.
- If you find a small breeze, add a drop of silicone sealant around the seam and allow proper cure time.
- Avoid permanent glues at parts you might need to remove later; use clamps where possible.
- For temporary fixes, always plan for a permanent replacement soon.
These tips help ensure your repair lasts. They show the small checks that make how to fix vacuum cleaner air leak in hose connection stick.

Common mistakes to avoid
A few easy mistakes can waste time or damage parts.
- Don’t over-tighten plastic fittings. You can crack the cuff.
- Don’t rely on tape alone for long-term fixes. Glue or a replacement cuff is better.
- Don’t ignore the motor end. Leaks near the motor cover can mean worn gaskets.
- Don’t buy the wrong-size hose. A tight but wrong-fit connection can still leak.
I learned these the hard way. Avoid them and your repair will be faster and cleaner.

When to replace the hose or call a professional
Replace the hose if it has several tears, holes inside the lining, or a crushed section. If the leak is inside the motor housing or near complex seals, call a pro. Professional service prevents motor damage and keeps warranty coverage intact. Knowing when to hand off the job is part of how to fix vacuum cleaner air leak in hose connection wisely.

Frequently Asked Questions of how to fix vacuum cleaner air leak in hose connection
How do I tell where the air leak is?
Run the vacuum and slowly move your hand along the hose and connections. Listen for hissing and use a damp tissue to spot air movement.
Can I use duct tape as a permanent fix?
Duct tape works short term but breaks down over time. Use silicone adhesive or replace the cuff for a lasting repair.
Is it safe to run the vacuum with a small leak?
Short runs are OK, but long use with leaks can strain the motor. Fix leaks promptly to avoid damage.
How much does a replacement hose cost?
Prices vary by model, but many universal hoses are affordable. OEM hoses cost more but fit better.
Do all vacuum hoses have the same diameter?
No. Hoses differ by brand and model. Measure the cuff diameter and connection type before buying a replacement.
Conclusion
You can fix most vacuum cleaner air leak in hose connection problems with simple tools, a clear inspection, and the right fix—tightening, patching, sealing, or replacing parts. Start with a careful inspection, choose the least invasive repair, and test thoroughly to ensure full suction returns. Try the steps today, keep a small repair kit ready, and share your results or questions below to help others learn.

Liora Pennings is a seasoned chef and kitchen enthusiast with a passion for turning everyday cooking into an effortless experience. With years of hands-on culinary expertise, she specializes in practical techniques, ingredient know-how, and smart kitchen solutions that help home cooks elevate their meals. At KitchFlair.com, Liora shares her best tips, time-saving tricks, and honest product reviews to guide readers toward a more efficient, enjoyable, and inspired cooking routine. Whether you’re a beginner or a seasoned home chef, Liora’s friendly, knowledge-packed insights make every visit to the kitchen a little easier—and a lot more delicious.