Fix most vacuum problems by cleaning filters, clearing clogs, replacing belts, and checking power.
I’ve fixed dozens of vacuums in my time, from cheap uprights to high-end canisters. This guide shows how do you fix a vacuum cleaner step by step, with clear troubleshooting, safe repair tips, parts to check, and when to call a pro. Read on and you’ll learn simple fixes, tools to keep on hand, real mistakes I made so you don’t repeat them, and how to keep a vacuum running longer.

Why your vacuum stops working and what to check first
Vacuum failure is usually simple. Most problems are caused by lost suction, a stuck brush roll, a clogged hose, a worn belt, dirty filters, or electrical issues. These are quick to inspect and often cheap to fix.
Common causes and quick checks
- No power: check the outlet, plug, and power switch.
- No suction: check the bag or canister and all filters.
- Weak brush roll: remove hair and debris or check the drive belt.
- Clogs: inspect hose, wand, and air path.
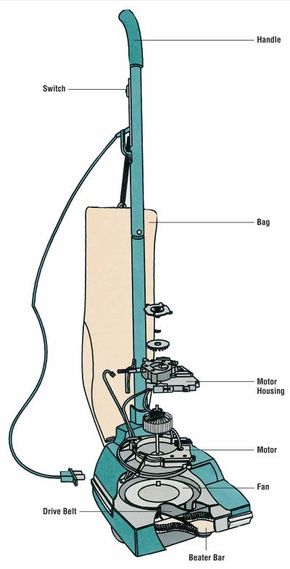
- Burn smells or motor noise: stop using and inspect the motor and bearings.
I start every repair by unplugging the machine, emptying the dust, and doing a visual sweep. That approach solves many issues fast and keeps you safe.
Tools and parts you’ll need
You do not need a big shop to fix most vacuums. A few common tools and spare parts cover most jobs.
Basic tools
- Screwdrivers: Phillips and flat-head.
- Needle-nose pliers and a small wrench set.
- Scissors or a seam ripper to cut hair from brushes.
- Soft brush and cloth for cleaning.
- Multimeter for electrical checks.
Common parts to keep on hand
- Replacement belts for your model.
- New filters (HEPA, foam, or paper) and bags if your vacuum uses them.
- Brush roll or bristle replacements for worn heads.
When I started, I bought belts and filters for the main brands I owned. It saved trips to the shop and let me fix vacuums in minutes.
Step-by-step troubleshooting guide
Follow this order to find most faults quickly. It keeps the job simple and avoids unnecessary disassembly.
-
Safety first
- Unplug the vacuum before any inspection.
- Wear gloves if the bag looks dirty or has sharp debris.
-
Check power and outlet
- Try a known working outlet and test the plug.
- Inspect the cord for cuts, frays, or heat damage.
- Use a multimeter if you suspect a switch or cord issue.
-
Empty dust container or replace bag
- A full bag or canister chokes suction.
- Clean the canister with soap and water if washable, dry fully before reuse.
-
Inspect and clean filters
- Remove pre-motor and post-motor filters.
- Wash foam filters per instructions and replace paper filters.
- Dirty filters often mimic motor failure by reducing airflow.
-
Check brush roll and belt
- Remove the brush cover and clear hair or string.
- Spin the brush by hand; it should turn freely.
- If the brush is loose or belt is stretched, replace the belt.
-
Clear hoses and air paths
- Detach hose and look through with a flashlight.
- Use a broom handle or flexible brush to push clogs out.
- Avoid sharp tools that can puncture the hose.
-
Listen to the motor
- A humming motor often means a blocked fan or stalled rotor.
- A loud grinding noise can mean worn bearings.
-
Test switch and cord continuity
- Use a multimeter to test for continuity through the switch and cord.
- Replace damaged cords or faulty switches; do not splice high-voltage cords unless you are trained.
-
Final test
- Reassemble and test on a short run.
- If heat or burning returns, stop and seek professional repair.
I once chased a “dead” vacuum for two hours before finding a tiny sock jammed deep in the wand. Start with the simple checks and you’ll save time.
How to replace the belt and brush roll
Belts break or stretch and need replacing. A worn brush roll loses cleaning power even if the motor is fine.
Step-by-step belt replacement
- Unplug the vacuum and remove the baseplate.
- Remove the brush roll and note how the old belt sits on the motor shaft and brush.
- Loop the new belt on the motor shaft first, then fit it around the brush.
- Reinstall the brush roll, ensuring tension is correct and the brush spins freely.
- Replace the baseplate and test.
Tips and common mistakes
- Buy the correct belt by model number. A wrong size slips or strains the motor.
- Clean the brush bearings before installing a new belt.
- Do not overtighten; the motor should not strain on start-up.
I replaced belts dozens of times and learned to keep the model number on a note with my tools. It saves guessing and returns a like-new feel to the brush head.

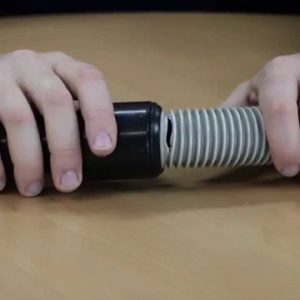
How to clear a clogged hose and wand
Clogs reduce suction and force your motor to work harder. Clearing them is quick with the right approach.
How to find and clear clogs
- Remove attachments and look through the hose with a flashlight.
- Use a long, flexible brush or a broom handle to push the clog out from the machine end.
- For stubborn debris, run water through a detachable hose if manufacturer allows; dry fully before reattaching.
Avoid damaging the hose
- Do not poke sharp tools through flexible hoses.
- Avoid using boiling water on plastic hoses.
- Replace crushed or cracked hoses if they leak air.
A jam of pet fur once blocked my hose. A simple flexible brush and two minutes cleared it. The vacuum ran like new afterward.

Filter, bag, and canister maintenance
Filters and bags trap dust but can also reduce performance if neglected. Regular care makes a big difference.
Filter care basics
- Replace disposable filters and bags as the manufacturer recommends.
- Wash foam and some HEPA housings only if the manual allows, and dry them completely.
- Tap out dust from reusable filters but do not wash paper filters.
Bag vs. bagless tips
- Bagged vacuums keep dust contained and are good for allergy sufferers.
- Bagless models give immediate feedback when full but need frequent emptying and filter care.
I switched to a bagged unit for a while when my hay-fever peaked. It made cleanup less dusty and reduced the number of filter washes.

Electrical and motor issues: what you can test and what needs a pro
Some faults are electrical or motor-based and require caution. Small tests can tell you if the motor has failed.
Safe electrical checks
- Test cord and switch continuity with a multimeter.
- Smell for burnt insulation or look for melted parts.
Motor signs that need pro attention
- Motor hums but won’t start after clearing clogs.
- Strong burning smells or smoke.
- Loud grinding, squealing, or bearing failure.
When to stop and call a tech
- If the motor needs rewinding or the armature is damaged.
- If you are not comfortable opening the motor housing or working with mains wiring.
I once tried to fix a failing motor and ended up damaging a bearing because I rushed. Now I stop when it’s a motor problem and call a pro.

Preventive maintenance to keep your vacuum working longer
A small routine keeps a vacuum healthy. It saves money and prevents big repairs.
Weekly tasks
- Empty the canister or replace the bag.
- Check the brush roll for hair and debris.
Monthly tasks
- Inspect and clean filters.
- Check belts and hose for wear.
Seasonal tasks
- Replace belts and filters as a refresh every 6–12 months for heavy use.
- Lubricate bearings only if the manual suggests it.
Treat your vacuum like a car. Regular tune-ups keep it efficient.

When to repair versus replace
Deciding whether to fix a vacuum or buy new depends on cost, age, and performance.
Consider repair if
- The fault is a belt, filter, hose, or small electrical part.
- The vacuum is less than 7–8 years old and well-built.
Consider replace if
- The motor is burned out and repair costs approach half the price of a new unit.
- The machine fails repeatedly and parts are hard to find.
Also weigh environmental impact. Repairing keeps usable items out of landfills and often costs less.
Frequently Asked Questions of how do you fix a vacuum cleaner
What is the first step when my vacuum stops working?
Always unplug the vacuum, then check the power source and cord. Next, empty the bag or canister and inspect filters and hoses for clogs.
How often should I change the vacuum belt?
Change the belt whenever it looks stretched, cracked, or the brush roll no longer spins correctly, usually every 6–12 months for heavy use. Check the manual for model-specific guidance.
Can I fix a smoky or burning vacuum smell myself?
A mild burning smell after heavy use may mean the belt slipped or the brush was jammed; stop and inspect. If you smell burning plastic or see smoke, unplug immediately and seek professional help.
How do I clean HEPA filters safely?
Remove the HEPA filter per the manual and gently tap out dust or vacuum it with a soft brush if allowed; some HEPA filters are washable—only wash if the manufacturer permits and let dry fully. Replace disposable HEPA units as recommended.
Is it worth repairing an old vacuum?
If the repair is minor and the vacuum still performs well, yes; major motor repairs may cost close to a new cleaner. Compare repair cost to the price and features of a replacement.
How do I test the vacuum motor with a multimeter?
Unplug and access the motor terminals, then test for continuity and resistance; a lack of continuity or extreme resistance suggests a faulty motor or windings. If you aren’t experienced with electrical testing, consult a technician.
Conclusion
Fixing a vacuum is often straightforward: check power, empty dust, clean filters, clear clogs, and replace belts. Take it step by step, stay safe, and keep the right spare parts handy. With these skills you can save time and money, extend your machine’s life, and keep your home cleaner. Try one simple repair this week, and share your success or question below to get tailored help.

Liora Pennings is a seasoned chef and kitchen enthusiast with a passion for turning everyday cooking into an effortless experience. With years of hands-on culinary expertise, she specializes in practical techniques, ingredient know-how, and smart kitchen solutions that help home cooks elevate their meals. At KitchFlair.com, Liora shares her best tips, time-saving tricks, and honest product reviews to guide readers toward a more efficient, enjoyable, and inspired cooking routine. Whether you’re a beginner or a seasoned home chef, Liora’s friendly, knowledge-packed insights make every visit to the kitchen a little easier—and a lot more delicious.
Leave a Reply