How To Rebuild Vacuum Cleaner Motor Step By Step: Quick Fix
Disassemble, clean, replace brushes and bearings, reassemble, and test the motor carefully.
I’ve rebuilt many vacuum motors over the years for clients and my own machines. I will walk you through how to rebuild vacuum cleaner motor step by step using plain language, clear photos, and hands-on tips. I explain tools, safety, diagnosis, the full teardown, part replacement, reassembly, testing, and common fixes. Read on to save money and learn a useful skill with confidence.

Tools and parts you’ll need
how to rebuild vacuum cleaner motor step by step starts with the right tools and parts. Use proper items to avoid damage and speed the job.
- Basic tools
- Phillips and flat screwdrivers
- Socket set and small wrench
- Needle-nose pliers
- Wire cutters and strippers
- Small hammer and punch
- Specialty tools
- Multimeter for continuity and voltage checks
- Bearing puller or bearing driver kit
- Rotor truing stone or fine sandpaper for commutator cleaning
- Soldering iron (if brushes or wires are soldered)
- Parts commonly replaced
- Carbon brushes
- Motor bearings (ball bearings or sleeve bearings)
- Armature (if severely damaged)
- Field coils or stator (rarely replaced unless burned)
- Insulating materials and heat shrink
- Safety gear
- Safety glasses
- Nitrile gloves
- Mask for dust and debris
Safety first: precautions before you start
how to rebuild vacuum cleaner motor step by step must begin with safety. Motors store no large charge, but dust, sharp parts, and wiring present hazards.
- Unplug the vacuum and remove the bag or canister.
- Work in a clean, well-lit area with a clear surface.
- Wear eye protection and a mask for dust and carbon residue.
- Note wiring and take photos before removing parts to aid reassembly.
- Avoid working on wet motors. Let any moisture dry completely.
- If the motor has asbestos or heavy contamination, stop and consult a pro.

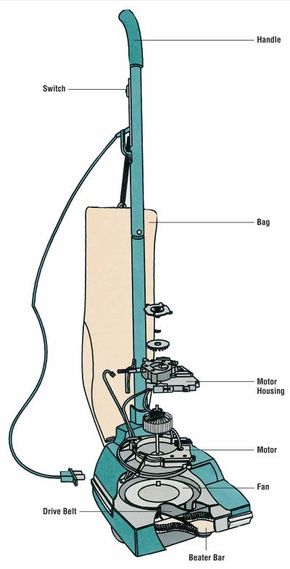
Understanding vacuum motor anatomy
how to rebuild vacuum cleaner motor step by step is easier when you know the parts and what they do.
- Armature (rotor)
- The rotating part with windings and commutator.
- Wears at the commutator and can have damaged windings.
- Field coil or stator
- Stationary windings around the motor casing that create magnetic flux.
- Brushes and brush holders
- Carbon blocks that supply current to the rotating commutator.
- Wear down and are often the first replaced item.
- Bearings or bushings
- Support the rotor and allow smooth spin.
- Noisy or rough bearings reduce performance.
- Commutator
- Copper segments the brushes contact. It can be pitted or dirty.
- End bells and housing
- Hold the motor together and often mount bearings.

Diagnose the problem before disassembly
how to rebuild vacuum cleaner motor step by step requires smart diagnosis. Testing first saves time and expense.
- Symptoms and likely causes
- No spin: broken brush wire, open circuit, or failed switch.
- Weak suction: clogged fan, burnt windings, or worn brushes.
- Noise or grinding: bad bearings or foreign debris.
- Smoke or burning smell: shorted windings or seized bearing.
- Quick tests
- Use a multimeter to check continuity across brushes and armature.
- Check for shorting between armature windings and shaft (insulation failure).
- Spin rotor by hand to feel rough spots or binding.
- When to replace vs repair
- Replace brushes and bearings routinely.
- Replace armature or stator only if windings are burnt or shorted beyond repair.

Step-by-step: how to rebuild vacuum cleaner motor step by step
how to rebuild vacuum cleaner motor step by step — follow these steps carefully. Take photos at each stage.
- Prepare and document
- Unplug the vacuum and remove the motor housing.
- Photograph wiring and connector positions.
- Label connectors with tape to avoid mistakes.
- Remove the motor assembly
- Unscrew motor mounting screws and detach fan housing.
- Carefully lift the motor out, keeping parts organized.
- Disassemble end bells and remove rotor
- Remove screws holding the end bells.
- Slide out the rotor. Inspect commutator and windings.
- Inspect brushes and holders
- Remove brush assemblies from holders.
- Measure brush length and check for cracks or glazing.
- Replace brushes if worn or brittle.
- Check and replace bearings or bushings
- Test bearing play by gently moving rotor side-to-side.
- Use a bearing puller for pressed bearings.
- Press new bearings in square and straight to avoid damage.
- Clean commutator and armature
- Use a brass brush and isopropyl alcohol to clean dirt.
- If commutator is rough, use a commutator stone or very fine sandpaper.
- Remove any debris from slots carefully with compressed air.
- Check armature windings
- Use a multimeter to test continuity across coils.
- Test for shorts to the shaft. Replace rotor if shorted.
- Reassemble with new parts
- Reinstall rotor, bearings, and end bells.
- Fit new brushes and ensure they slide freely.
- Reconnect wiring per your photos and labels.
- Lubrication
- Use light machine oil on bushings if required.
- Do not over-lubricate ball bearings or motor internals.
- Final checks before power-up
- Spin rotor by hand to check for rubbing or binding.
- Verify wiring with a continuity check.
Reassembly, testing, and break-in
how to rebuild vacuum cleaner motor step by step ends with careful reassembly and testing to ensure longevity.
- Reassembly tips
- Tighten fasteners evenly to avoid misalignment.
- Keep brushes in their holders until the final assembly step.
- Ensure the fan is mounted the correct way for airflow.
- Testing steps
- First test: with the motor mounted, run briefly without full load to watch for smoke or noise.
- Use a clamp meter or tachometer to check current draw and RPM. Compare to manufacturer specs.
- If current is high, stop immediately and inspect for misalignment or shorted windings.
- Break-in period
- Run the vacuum for 10–15 minutes while checking temperature and smell.
- New brushes can spark slightly during seating; minor sparking is normal, heavy sparking is not.

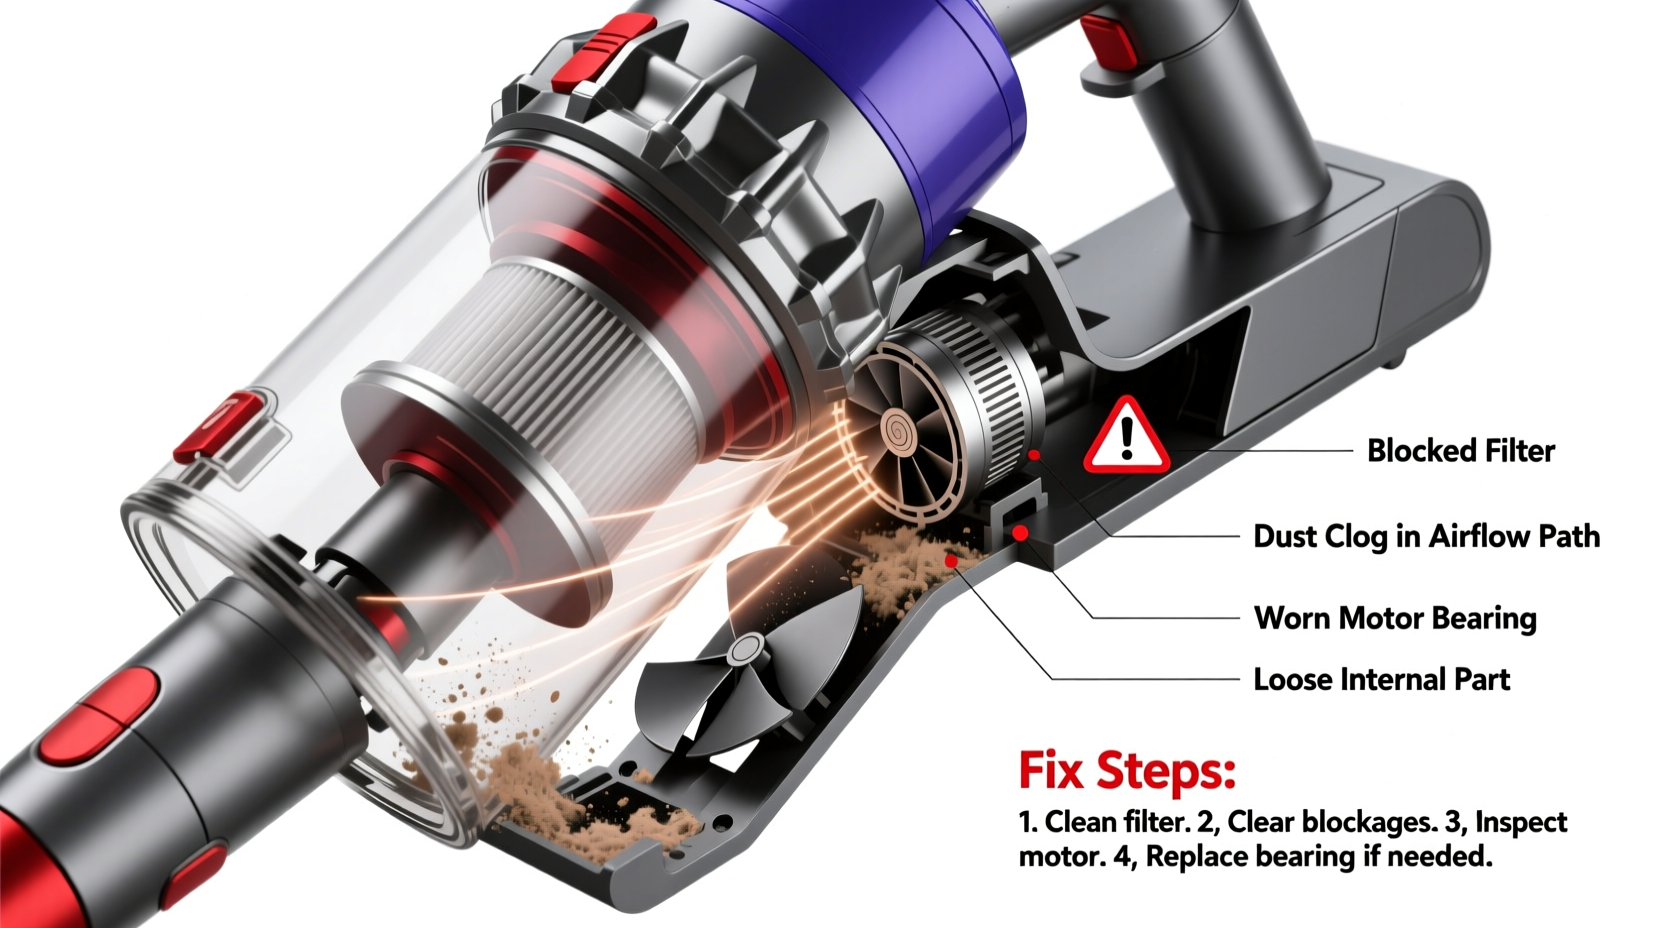
Troubleshooting and common fixes
how to rebuild vacuum cleaner motor step by step includes knowing how to handle problems after rebuild.
- Persistent sparking
- Normal with new brushes for a short time. Heavy sparking means commutator damage or bad brush seating.
- Motor hums but won’t start
- Check for rotor rubbing, seized bearings, or field coil issues.
- Overheating
- Check airflow path, blocked fan, or shorted windings. Reduce run time and test again.
- Loud bearings or vibration
- Replace bearings and check rotor balance if necessary.
- Electrical faults after reassembly
- Re-check wiring photos and connections. Ensure no loose strands creating shorts.
Preventive maintenance and tips I learned the hard way
how to rebuild vacuum cleaner motor step by step becomes easier with routine care. These are lessons from my repairs.
- Replace brushes before they’re fully worn to protect the commutator.
- Keep filters and bags clean to reduce motor strain.
- Use the correct replacement bearings and brushes. Generic parts can be poor fit.
- Take clear photos before disassembly. I once mixed wiring and had to re-tear an assembly to correct it.
- Do small test runs after each repair step. It saves big fixes later.

Frequently Asked Questions of how to rebuild vacuum cleaner motor step by step
How long does it take to rebuild a vacuum motor?
A typical rebuild takes 1–3 hours for a hobbyist and 30–60 minutes for a practiced technician, depending on access and parts.
Can I replace the brushes myself?
Yes. Replacing brushes is one of the easier rebuild steps and is suitable for most DIYers with basic tools.
When should I replace the armature or field coil?
Replace the armature or field coil if windings are burned, insulation is damaged, or electrical tests show shorts or opens.
Is it safe to run a rebuilt motor immediately at full load?
No. Run a brief break-in with light load and monitor temperature, noise, and current before full use.
What common mistakes should I avoid when rebuilding?
Don’t skip photos, mix up wiring, over-lubricate bearings, or use ill-fitting replacement parts. Those errors cause repeat failures.
Conclusion
Rebuilding a vacuum motor is a practical skill. You can save money and extend appliance life by following clear steps for diagnosis, careful disassembly, part replacement, cleaning, and testing. Start with the right tools, document everything, and run safe, short break-in tests. If you run into complex electrical faults or major winding damage, consult a professional. Try one rebuild on a spare or low-cost unit to build confidence, then tackle your main machines. Leave a comment with your model and symptoms, or subscribe to get rebuild tips and photo guides.

Liora Pennings is a seasoned chef and kitchen enthusiast with a passion for turning everyday cooking into an effortless experience. With years of hands-on culinary expertise, she specializes in practical techniques, ingredient know-how, and smart kitchen solutions that help home cooks elevate their meals. At KitchFlair.com, Liora shares her best tips, time-saving tricks, and honest product reviews to guide readers toward a more efficient, enjoyable, and inspired cooking routine. Whether you’re a beginner or a seasoned home chef, Liora’s friendly, knowledge-packed insights make every visit to the kitchen a little easier—and a lot more delicious.