How To Repair A Coffee Maker That Won’t Turn On: Quick Fix
Unplug, check power, test outlet, reset switches, descale, and replace a failed fuse or cord.
I’ve fixed dozens of dead coffee makers for friends, family, and my own kitchen. This guide on how to repair a coffee maker that won’t turn on walks you through safe, step-by-step checks and fixes. I’ll explain simple things you can do at home, when to use a multimeter, what parts fail most often, and when it’s smarter to replace the machine. Read on and you’ll be able to diagnose the problem and try reliable repairs with confidence.

Quick diagnostic checklist: what to check first
Start with simple checks that solve most problems fast. Each line is a quick test you can do in minutes.
- Check the power source. Plug another appliance into the same outlet to confirm power.
- Inspect the power cord. Look for cuts, kinks, or loose prongs.
- Reset switches and timers. Some machines have an on/off switch or clock that needs resetting.
- Test the outlet and GFCI. Some kitchens use GFCI outlets that trip.
- Check the water reservoir and lid. Some models refuse to power on if sensors detect no water or an open lid.
- Look for visible damage. Burn marks, melted plastic, or a burned smell mean stop and consider professional help.
How to repair a coffee maker that won’t turn on often starts with these checks. They catch the low-effort, high-success fixes first.
Safety first: basic rules before you open the machine
Safety comes before fixes. Coffee makers mix water and electricity, so take simple precautions.
- Unplug the machine and let it cool for at least 15 minutes.
- Empty water from the reservoir and carafe to avoid spills while working.
- Work on a dry, well-lit surface. Use a towel or mat to catch small parts.
- Use insulated tools and avoid touching internal parts when plugged in.
- If you see corrosion, a burned part, or the heating element exposed, stop. These signs need a trained technician.
Following safety steps reduces risk and keeps your repair work straightforward.

Basic fixes you can try at home
Many no-power issues come from small, replaceable things. These fixes use simple tools and clear steps.
- Test another outlet and the plug
- Plug a lamp or phone charger into the same outlet. If that device works, the outlet is fine.
- Wiggle the coffee maker’s plug gently. If power is intermittent, replace the cord or the plug.
- Reset the machine
- Some coffee makers have a reset button or a detachable control pod. Unplug for five minutes, then plug back in.
- If there’s a clock or program, reset it. Sometimes a stuck timer blocks startup.
- Check safety interlocks
- Ensure the carafe is seated and the lid is closed. Many models have a small switch that prevents start if the carafe is absent or the lid is open.
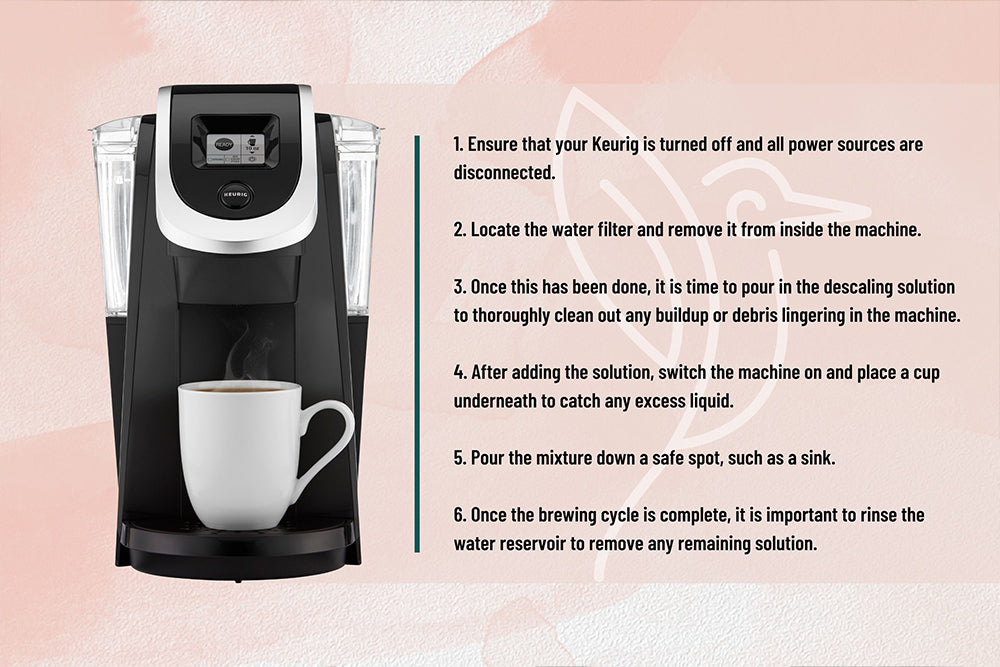
- Clean mineral buildup and sensors
- Run a descaling cycle with white vinegar or a descaler. Scale can block sensors and heating functions.
- Clean contacts near the reservoir with a cotton swab dampened with isopropyl alcohol.
- Replace a faulty fuse
- Some machines have a small user-accessible fuse in the plug or base. Replace it with the same rating.
- Look for tripped GFCI or power strip issues
- Reset the GFCI in the outlet or try a different power strip. Surges or ground faults can stop the maker from powering on.
These fixes cover many common scenarios when learning how to repair a coffee maker that won’t turn on. They save money and are quick to try.

Intermediate repairs: tools, testing, and parts to replace
If basic fixes fail, you may need to open the case and test components. Work only if you’re comfortable with simple electronics.
Tools to have
- Multimeter for continuity and voltage checks.
- Screwdriver set, small pliers, and needle-nose tweezers.
- Replacement parts: power cord, thermal fuse, switches, or a heating element.
Common parts to test and replace
- Power cord
- Test continuity with a multimeter. No continuity means replace the cord.
- Thermal fuse / thermal cutoff
- Thermal fuses fail when the heater overheats. Test with a multimeter for continuity. If open, replace with same spec.
- On/off switch and control board
- Test the switch for continuity. If the switch works but the board doesn’t, the control board may be faulty.
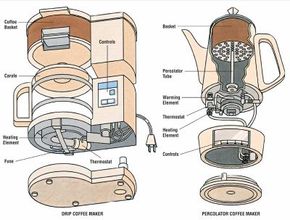
- Heating element
- If the machine powers on but won’t heat, test the heating element for continuity and correct resistance.
- Door or lid switches
- Many machines use simple snap switches. These can fail and stop the unit from powering on.
Step-by-step for testing with a multimeter
- Unplug and open the case. Keep screws in a tray and take photos for reassembly.
- Set the multimeter to continuity or low ohms.
- Check the power cord, then trace to the fuse and switch.
- Test each switch and fuse in sequence. Replace any open component.
When replacing parts, buy OEM or exact-spec parts. Mismatched fuses or elements can create hazards.

When to call a professional or replace the machine
Not all coffee makers are worth fixing. Consider these factors.
- Age and cost
- Machines older than 5–7 years may have multiple failing parts. Repair cost can exceed replacement.
- Safety concerns
- Burned circuitry, melted plastic, or exposed heating elements require trained repair or disposal.
- Warranty status
- If under warranty, contact the manufacturer first. Do not open the machine if it voids coverage.
- Cost estimates
- Small repairs like replacing a cord or fuse are cheap. Control board replacements can be costly and time-consuming.
If you feel unsure about working with mains power or if the fault looks like burned electronics, call a qualified repair service. That’s a safe and sometimes cost-effective choice.
Maintenance tips to avoid power problems
Regular care prevents many no-power issues. These simple habits extend life and prevent surprise breakdowns.
- Descale every 2–3 months in hard water areas. Scale clogs sensors and loads the heater.
- Use filtered water to reduce mineral buildup.
- Unplug during storms to avoid surge damage.
- Keep the maker dry and clean. Wipe spills immediately.
- Inspect the cord and plug monthly. Replace at first sign of wear.
A few minutes of care now can save you a repair bill later.

Troubleshooting examples and personal experience
I repair small appliances as a hobby. Here are three real cases that show how to repair a coffee maker that won’t turn on.
- Case 1: Dead outlet was the cause
- A friend’s drip brewer wouldn’t start. Testing showed the outlet was dead due to a tripped GFCI. Resetting the outlet fixed it in seconds. Lesson: always test the outlet first.
- Case 2: Thermal fuse blew
- My old machine stopped powering up after years of hard use. A multimeter showed an open thermal fuse. Replacing the fuse restored power. Lesson: thermal fuses die when heaters overwork.
- Case 3: Faulty lid switch
- A single-serve brewer refused to run. The lid switch was dirty and misaligned. Cleaning and realigning the switch fixed it. Lesson: small sensors matter.
Each fix boosted my confidence. I learned to take photos during disassembly and to store screws by step. These small habits make repairs simpler and safer.
Frequently Asked Questions of how to repair a coffee maker that won’t turn on
What should I try first if my coffee maker won’t turn on?
Check the outlet and plug in another device to confirm power. Unplug the coffee maker, inspect the cord, and try resetting any internal switch or timer.
Can descaling fix a coffee maker that won’t power on?
Descaling often helps when sensors or the heating cycle are blocked by scale. It won’t fix broken wiring or burned fuses, but it’s a low-risk first step.
How do I test the power cord and fuse?
Use a multimeter set to continuity. Test the cord from plug to connector and test the thermal fuse for continuity. No reading means the part is open and needs replacement.
Is it safe to replace internal parts myself?
You can do simple parts replacements if you are comfortable with tools and the machine is unplugged. If you see burned components or if you must work with live voltage, get a pro.
When is it better to replace the coffee maker?
Replace when repair costs approach the price of a new unit, the machine is over 5–7 years old, or when repairs expose major safety damage like melted wiring.
Conclusion
You can fix many common faults that cause a coffee maker to not turn on. Start with simple checks: test the outlet, inspect the cord, reset switches, and descale. Move to multimeter checks for the fuse, switch, and heating element if basic steps fail. Be honest about safety and repair cost—sometimes replacing the unit is the wiser choice. Try these steps, keep notes, and share your experience or questions below. If you want more guides like this, subscribe or leave a comment with your model and symptoms.

Liora Pennings is a seasoned chef and kitchen enthusiast with a passion for turning everyday cooking into an effortless experience. With years of hands-on culinary expertise, she specializes in practical techniques, ingredient know-how, and smart kitchen solutions that help home cooks elevate their meals. At KitchFlair.com, Liora shares her best tips, time-saving tricks, and honest product reviews to guide readers toward a more efficient, enjoyable, and inspired cooking routine. Whether you’re a beginner or a seasoned home chef, Liora’s friendly, knowledge-packed insights make every visit to the kitchen a little easier—and a lot more delicious.