How To Replace The Belt On A Shark Vacuum Cleaner: Easy Fix
Replace the Shark vacuum belt by removing the brushroll, fitting a new belt, and reassembling in minutes.
I’ve repaired dozens of vacuums and can walk you through how to replace the belt on a Shark vacuum cleaner with clear steps and tips. This guide mixes hands-on experience, common mistakes I’ve seen, and simple fixes so you can do the job quickly and safely. Read on for tools, step-by-step instructions, troubleshooting, and maintenance advice to keep your Shark running like new.

Tools and parts you need
Before starting, gather the right tools and parts so the job goes smooth. A worn belt or wrong size belt will not work well, so get the correct replacement for your model. Keep a flashlight and a small screwdriver handy for tight spots, and have paper towels to catch dust.
- Replacement belt matched to your model (check model number under the dust cup)
- Phillips screwdriver or Torx driver, depending on your model
- Needle-nose pliers for springs or clips
- Soft cloth or paper towel to clean the brush area
- Flashlight to inspect hidden parts

When to replace the belt
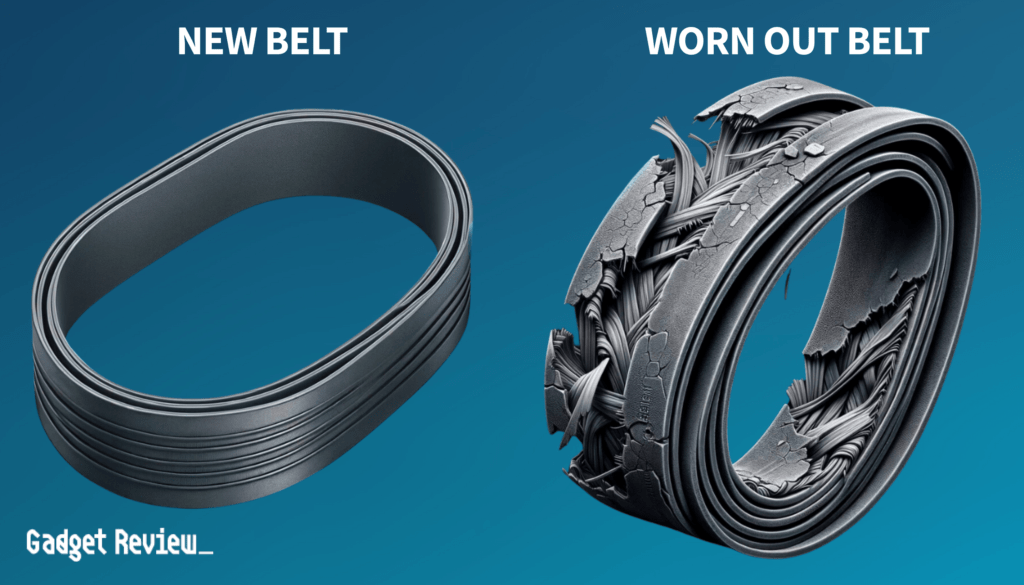
Knowing when to act saves time and prevents damage. Signs your belt needs replacing are obvious brushroll slip, burning smell, visible cracks, or a brushroll that won’t spin. If suction is fine but the brushroll stalls, learning how to replace the belt on a Shark vacuum cleaner is the next step.
- Brushroll not spinning or spins slowly
- Loud burning or rubber smell during operation
- Visible belt frays, cracks, or slack
- Brush bristles hitting the housing due to sagging belt
Step-by-step: how to replace the belt on a Shark vacuum cleaner
Follow these steps in order. Take your time and keep parts organized. I recommend a small tray to hold screws so nothing gets lost.
- Unplug and prepare
- Turn off and unplug the vacuum. Safety first.
- Lay the vacuum on a flat surface with the nozzle facing up.
- Remove the brushroll cover
- Locate and remove the screws that hold the bottom plate. Keep them in order.
- Lift off the plate and set it aside.
- Remove the brushroll and old belt
- Slide the brushroll out of its housing. Note how the belt loops around the motor shaft.
- Remove the old belt. If it’s broken, pull off any bits left on the motor shaft.
- Inspect and clean
- Wipe dust and hair from the brush cavity and motor shaft.
- Check brush bearings and end caps. Replace damaged parts before fitting a new belt.
- Fit the new belt
- Loop the new belt over the motor shaft first. This gives better alignment.
- Stretch the belt gently and slide it onto the brushroll groove.
- Reinstall the brushroll, ensuring the belt tracks straight and the brush spins freely when nudged.
- Reassemble and test
- Replace the bottom plate and tighten screws.
- Plug in and run the vacuum for a few seconds. Listen for smooth rotation and no strange noises.
In my experience, looping the belt over the motor shaft first makes fitting easier. If the belt resists, check for misaligned parts or debris. Replacing the belt is often faster than you think and usually fixes brush issues.

Troubleshooting common problems after replacement
If the brush still won’t spin, don’t panic. Small details are often the cause and easy to fix. I’ve fixed many vacuums where the belt was new but installed wrong or a bearing was seized.
- Belt slips off
- Check that the belt sits in the brush groove and on the motor shaft. Re-seat if needed.
- Brush won’t spin at all
- Verify the motor shaft is not worn and the belt is the correct size. Inspect brush end caps for seized bearings.
- Vacuum makes a burning smell
- Turn off immediately. A smell can mean the belt is rubbing or misaligned. Reinstall and test at low power.
- Excessive vibration or noise
- Ensure the brushroll is installed in the right direction and the belt is not twisted. Check for worn brush bristles.

Maintenance tips to extend belt life
A little care prevents frequent belt changes. I treat my Shark vacuums like tools. I clean the brushroll after each heavy use and check the belt monthly. These habits cut down on replacements and keep suction strong.
- Remove hair wrapped around the brushroll every 1–2 weeks
- Clean the brush cavity and motor shaft to remove grit
- Replace the belt at first signs of cracking rather than waiting for failure
- Keep the vacuum on hard-floor mode when cleaning rugs lightly to reduce belt strain
Parts, model matching, and where to buy
Using the correct replacement part is key. Always match your model number when ordering belts. I once ordered a generic belt and lost time fixing fit issues. Save time by using the model number printed on the vacuum base.
- Find model number under dust cup or on the base plate
- Use OEM belts or high-quality aftermarket belts rated for Shark models
- Local parts stores, big online retailers, and manufacturer parts pages are solid sources
- Compare dimensions: inner circumference and width match your old belt
Safety and final checks
Simple checks prevent accidents and damage. Before you finish, make sure fasteners are tight and nothing blocks the brushroll. I always run a short test on carpet and hard floor to confirm the fix.
- Double-check all screws and clips are secure
- Confirm the brushroll spins freely by hand before power up
- Run the vacuum for 10–15 seconds and listen for odd sounds
- If problems persist, consult a professional or authorized service
Frequently Asked Questions of how to replace the belt on a shark vacuum cleaner
What belt size does my Shark vacuum need?
Look up the model number on the vacuum base and match it to the replacement belt listing. Belt listings usually show length and width so you can verify compatibility.
How long does a Shark vacuum belt last?
With normal use, belts last 6–12 months, depending on debris and hair load. Replacing at the first sign of cracking prevents sudden failure.
Can I use any universal belt for my Shark vacuum?
Universal belts sometimes work, but a model-specific belt ensures fit and longevity. A wrong size can slip or damage the brushroll.
Is it hard to replace the belt myself?
No, the job is straightforward for most models and takes 10–20 minutes. Basic tools and following steps will get you through it safely.
My brush still doesn’t spin after replacing the belt. What now?
Check for seized brush bearings, misaligned parts, or a worn motor shaft. If those look fine, consider a professional inspection to avoid further damage.
Do I need to remove the belt when storing my vacuum?
You don’t need to remove it, but store the vacuum in a cool, dry place to avoid belt drying or cracking. If storing long-term, check the belt before reuse.
Conclusion
Replacing the belt on a Shark vacuum cleaner is a small job that saves time and money. With the right belt, basic tools, and a few careful steps, you can restore brushroll power in under 30 minutes. Try the steps above, keep a replacement belt on hand, and treat the vacuum to regular brush cleaning to extend life and performance. If this guide helped, leave a comment, subscribe for more repair tips, or share your experience with other readers.

Liora Pennings is a seasoned chef and kitchen enthusiast with a passion for turning everyday cooking into an effortless experience. With years of hands-on culinary expertise, she specializes in practical techniques, ingredient know-how, and smart kitchen solutions that help home cooks elevate their meals. At KitchFlair.com, Liora shares her best tips, time-saving tricks, and honest product reviews to guide readers toward a more efficient, enjoyable, and inspired cooking routine. Whether you’re a beginner or a seasoned home chef, Liora’s friendly, knowledge-packed insights make every visit to the kitchen a little easier—and a lot more delicious.